The takeoff is the part everyone talks about. It is also the part where the work stops being measurable. You have square yards of CPT-1, square feet of LVT-1, linear feet of 4 inch rubber base and a stair count. None of that is a price yet, and none of it tells the GC anything until it turns into a proposal.
This is the path BidWise takes from a finished takeoff to a bid you can send, using the takeoff program you already have. Every step shows the real screen, and the yellow numbers on each picture match the numbered clicks under it.
Step 1Pick your takeoff program1 min
WhereDashboard
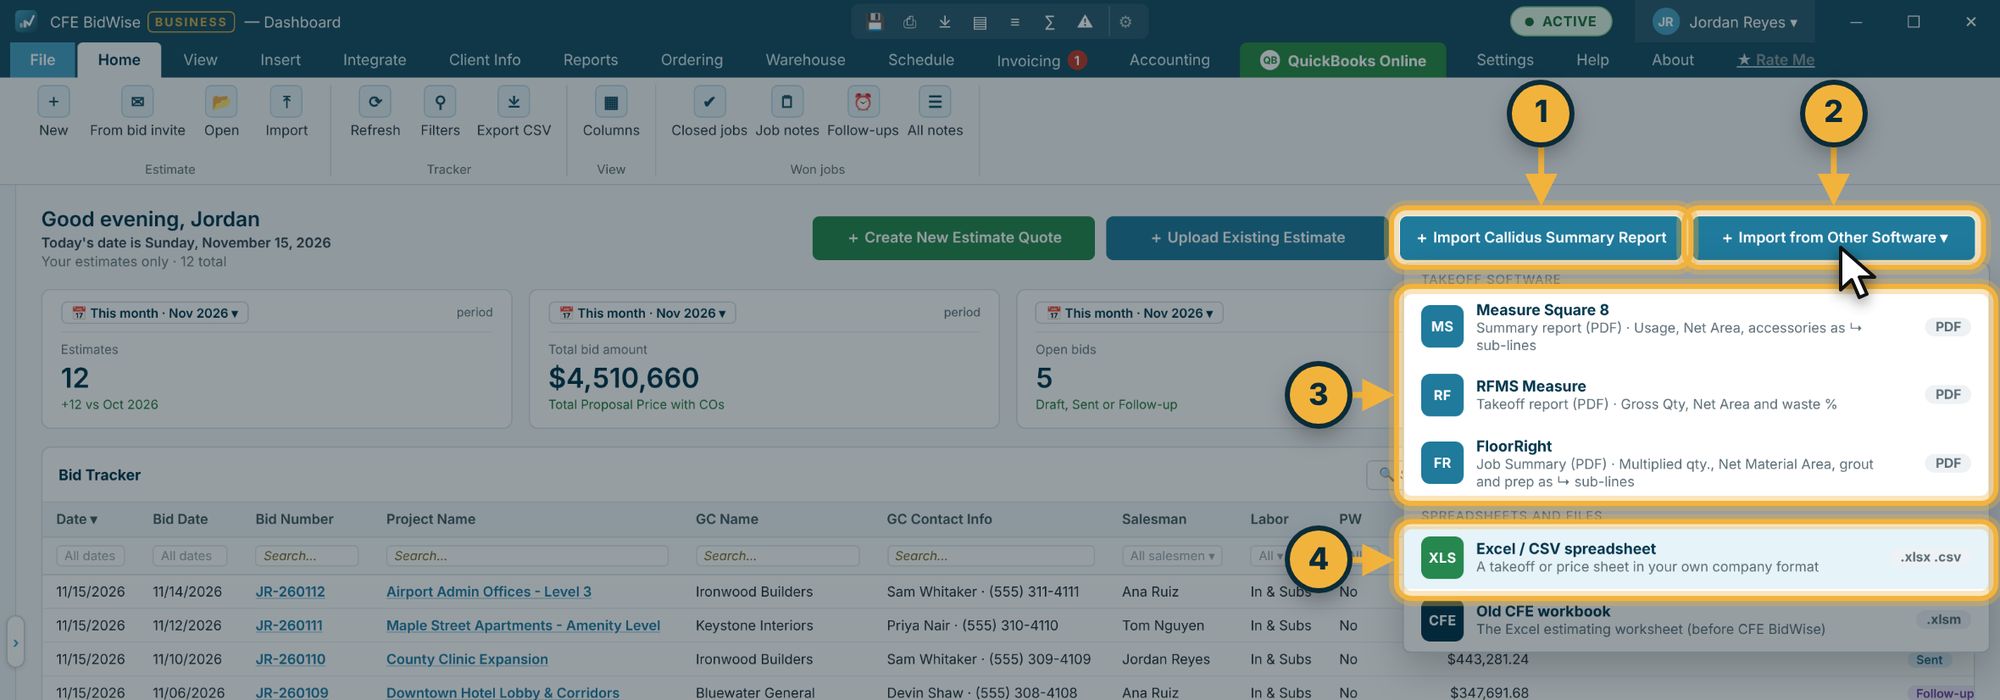
- Takeoff in Callidus? Click Import Callidus Summary Report. In Callidus, export the Summary Report as a PDF first.
- Anything else: click Import from Other Software.
- Pick Measure Square 8 (the Summary report PDF), RFMS Measure (the takeoff report PDF) or FloorRight (the Job Summary PDF).
- Or pick Excel / CSV spreadsheet for a takeoff or price sheet in your own company format.
Step 2Open the takeoff PDF1 min
WhereImport Takeoff
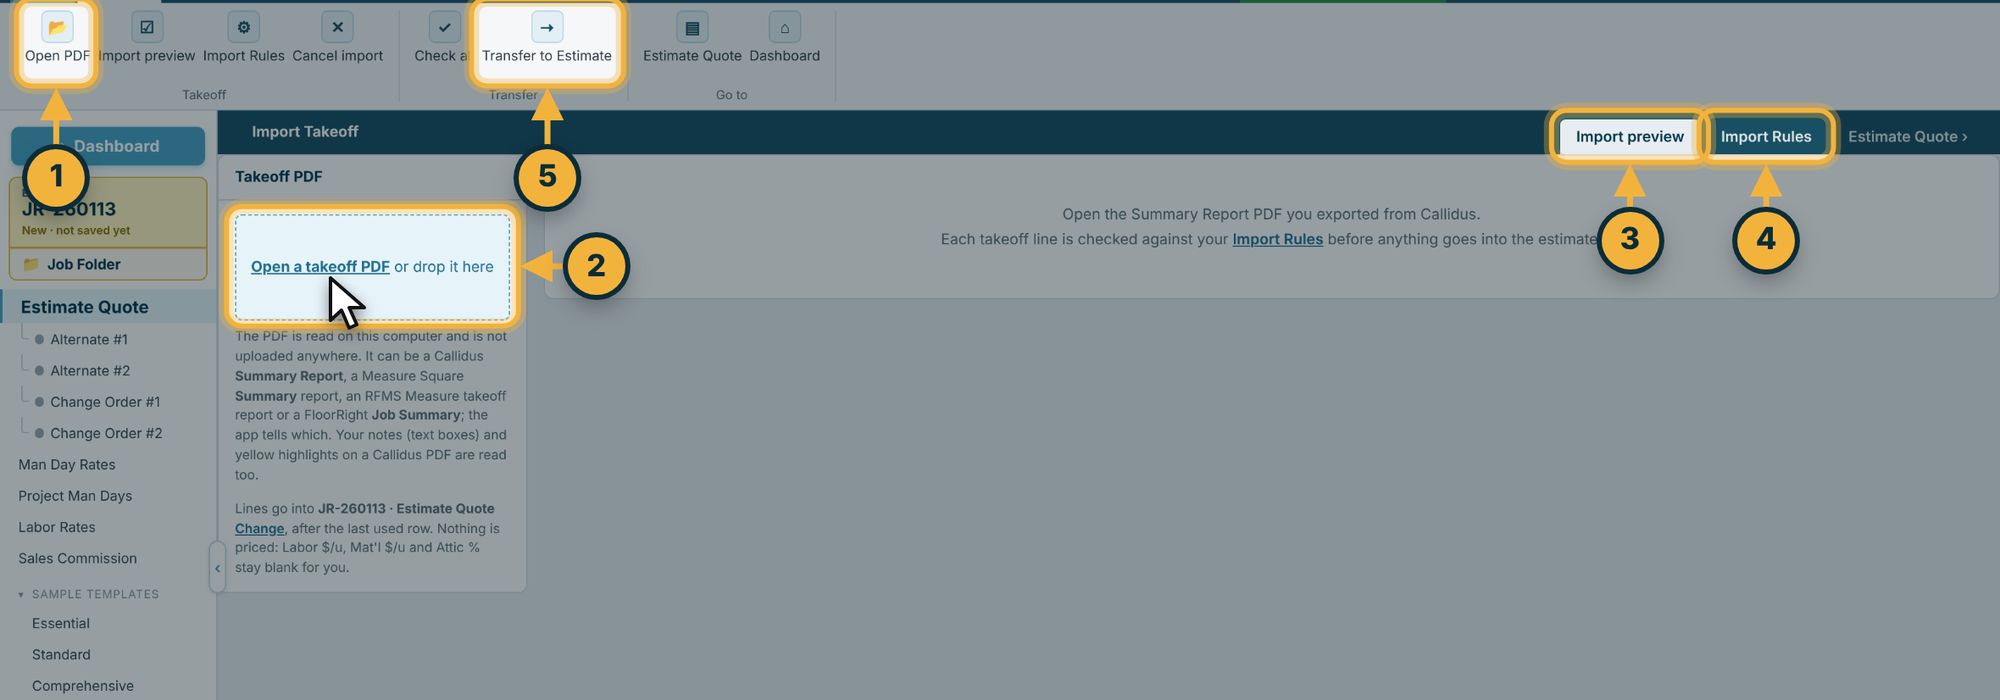
- Click Open PDF on the ribbon,
- or click Open a takeoff PDF in the box on the left, or drag the PDF onto it. The PDF is read on your PC and is never uploaded anywhere.
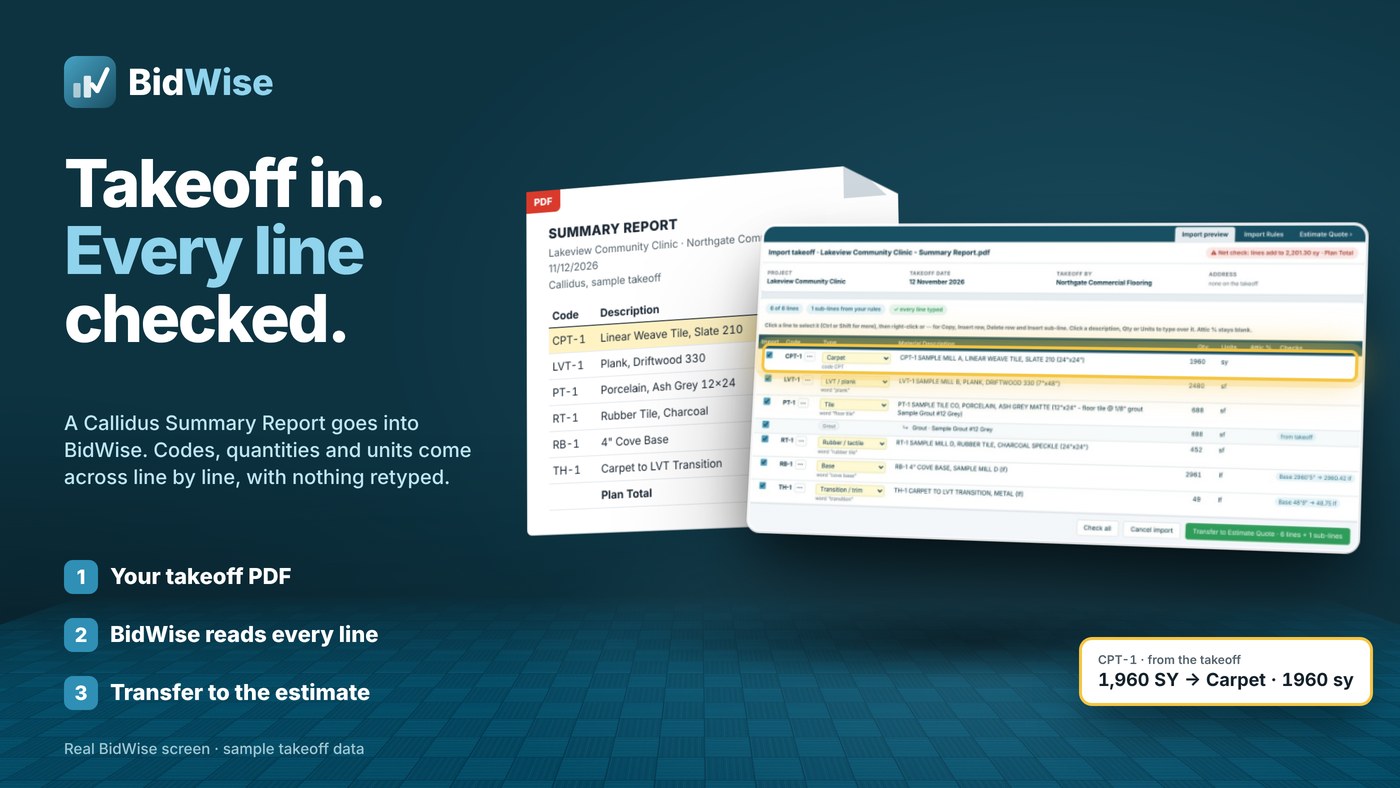
- The Import preview fills in with every line it read.
- Import Rules is where you teach BidWise your codes and words, such as CPT means Carpet or "cove base" means Base. Set them once and every import after that uses them.
- Transfer to Estimate sends the checked lines to the estimate. That is step 4.
The lines go into the estimate after the last row you used. Nothing is priced yet: Labor $/u, Mat'l $/u and Attic % stay blank for you.
Step 3Check the import preview3 min
WhereImport Takeoff›Import preview
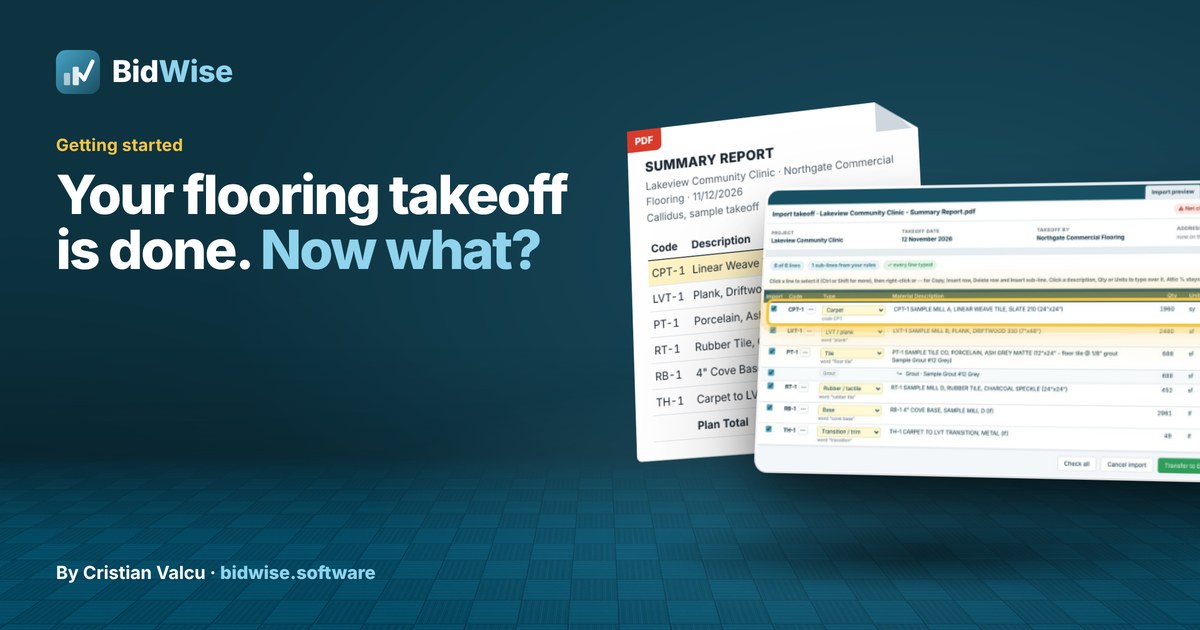
BidWise reads the report and shows every line before anything goes in. Each product and color becomes its own line with its quantity and unit.
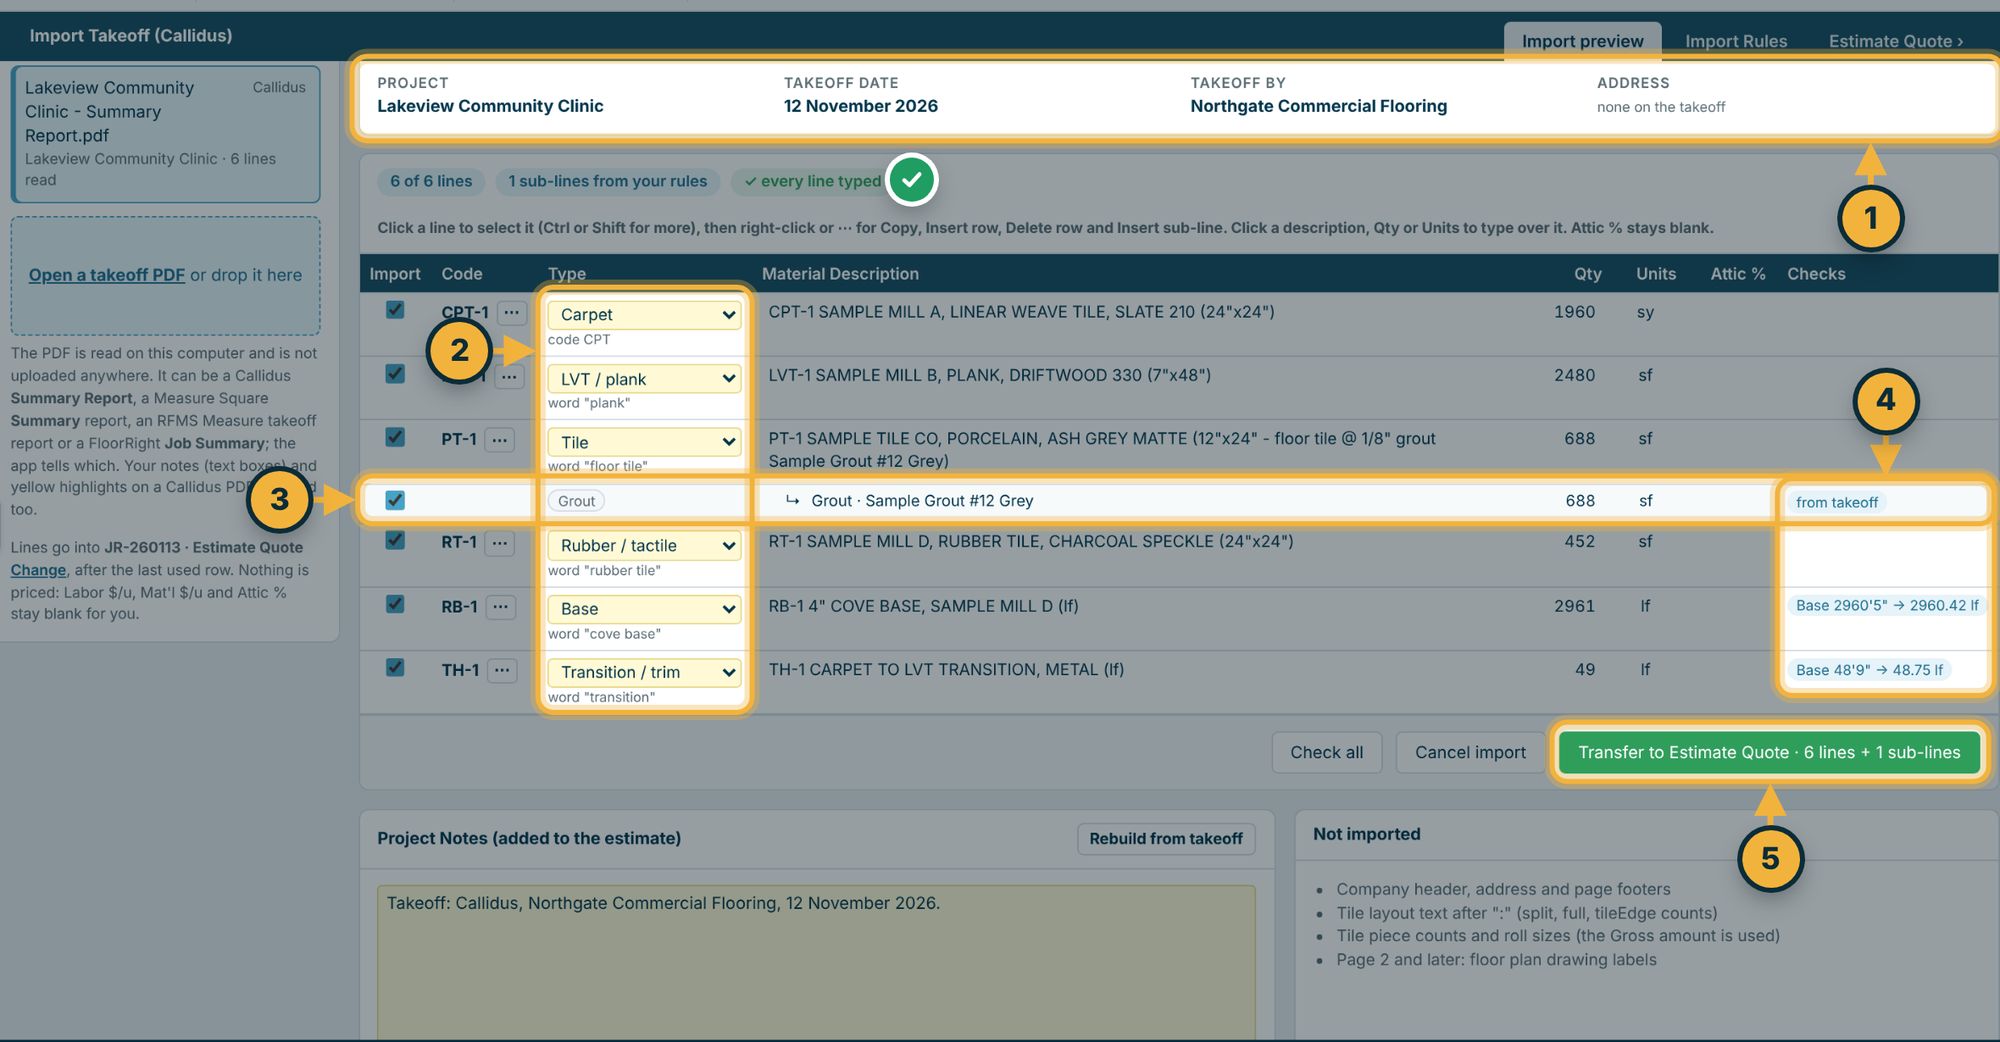
- Check the project, takeoff date and estimator read from the report. The green badge says when every line has a type.
- The Type column comes from your Import Rules: Carpet, LVT / plank, Tile, Rubber / tactile, Base, Transition / trim. Change any one with its drop-down.
- Grout, adhesive and prep that belong to a product land as a sub-line under it.
- Checks shows what BidWise changed, such as base of 2960'5" turned into 2960.42 LF.
- Untick any line you don't want, then click Transfer to Estimate Quote.
It works the same way for every program BidWise reads. The reports look different and put the units and net areas in different columns, but BidWise knows each layout, so the lines land the same way whichever program measured the job. Project notes such as the takeoff source and date go to the estimate's Project Notes.
Step 4Transfer it to the estimate1 min
WhereEstimate Quote
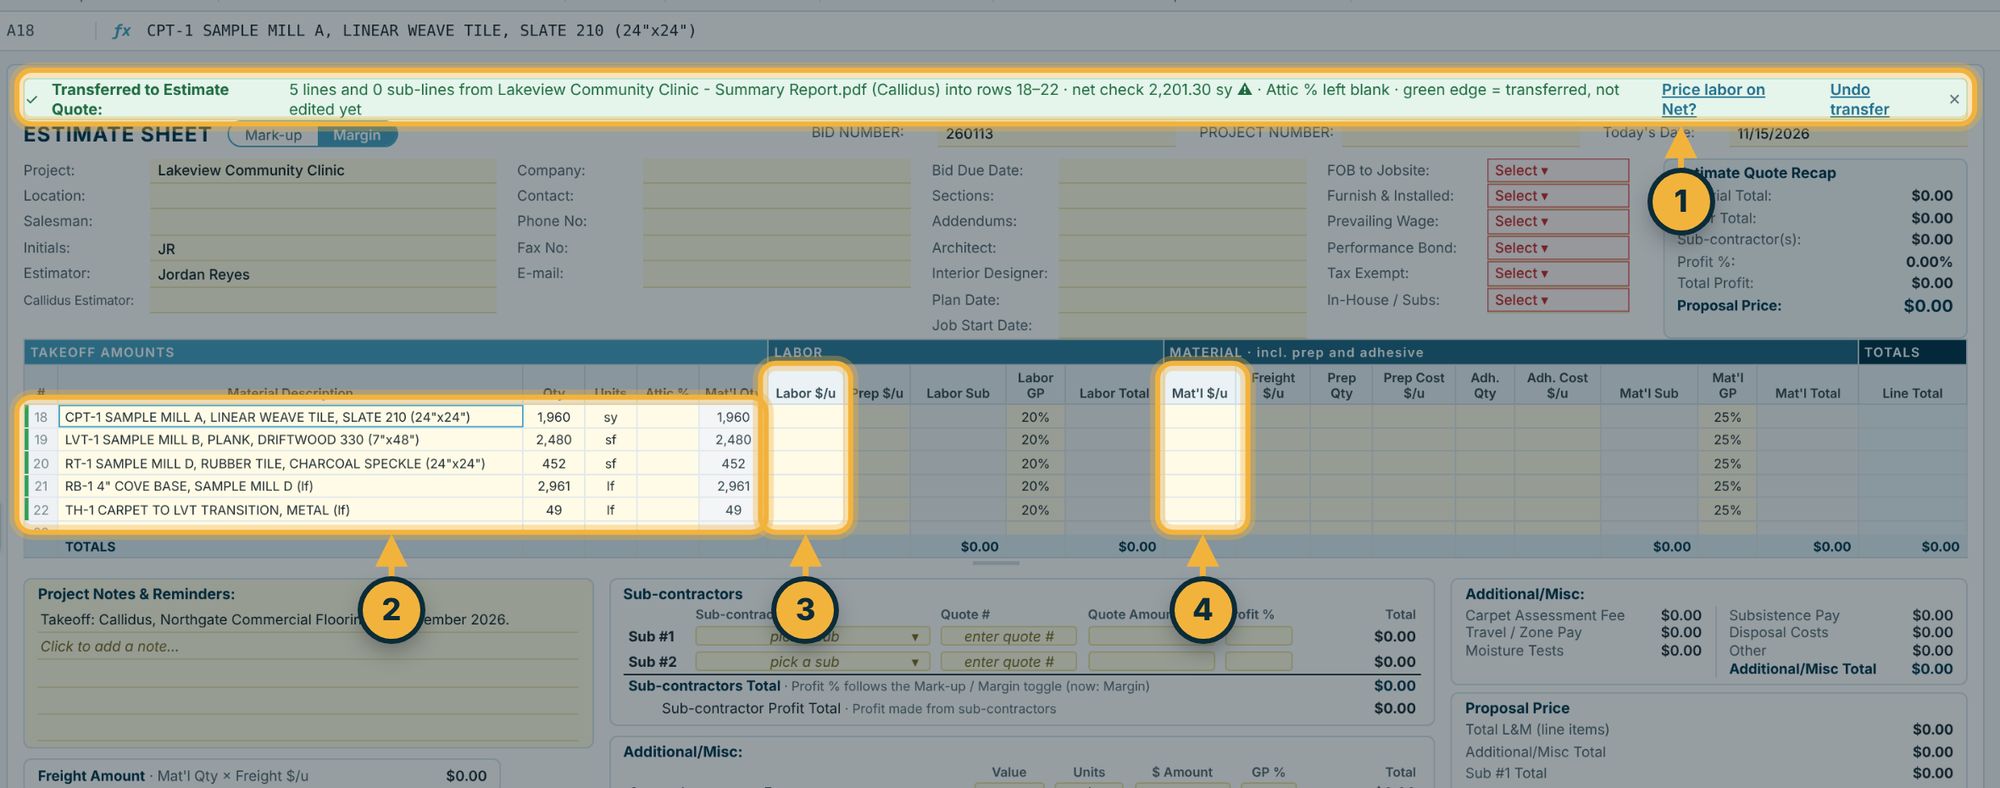
- The green banner tells you what came in, from which file, into which rows, and the net check against the report's total. Undo transfer takes it all back out.
- Your takeoff lines are in, with their quantities and units, marked with a green edge until you edit them.
- Labor $/u is blank: type your labor price per unit on each line.
- Mat'l $/u is blank: type your material cost per unit. Labor GP and Material GP fill in from your Settings.
Step 5Price it line by line10 min
WhereEstimate Quote
Instead of one markup at the bottom, every line carries its own Labor GP and Mat'l GP. When a bid is tight, you can sharpen labor on the carpet tile without giving away margin on the sheet vinyl that took real skill to install.
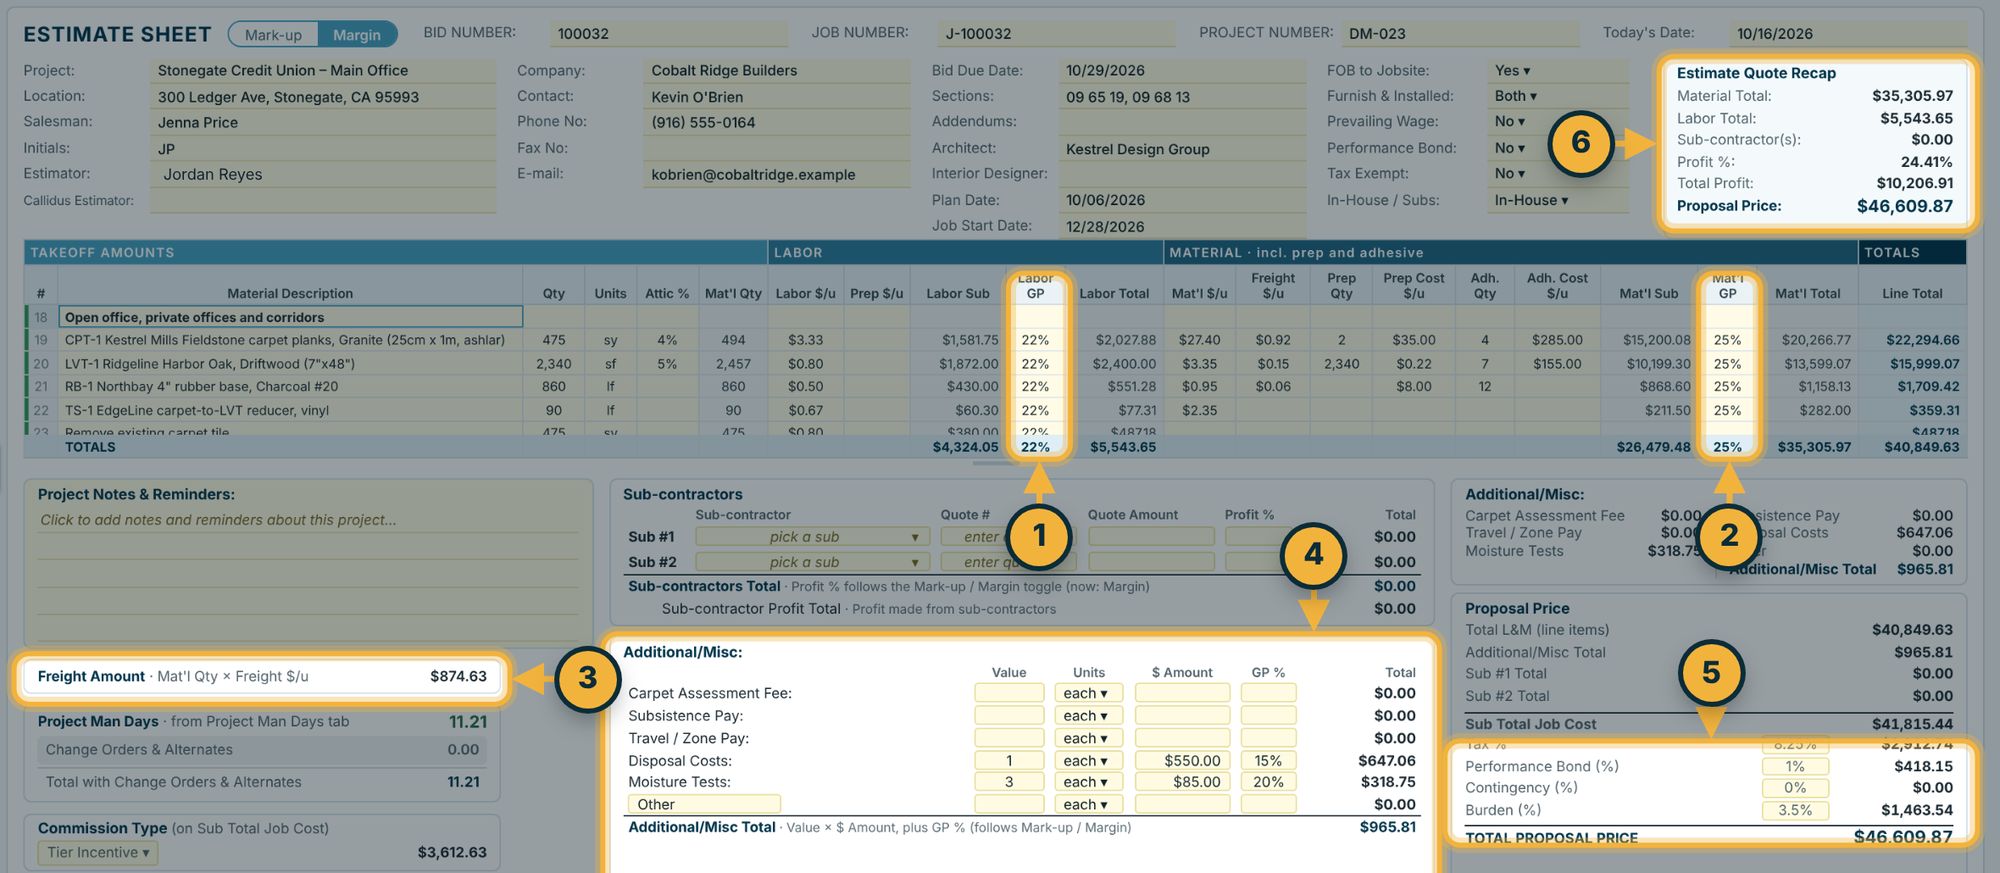
- Labor GP on each line. Change it on the lines where you need to be sharper.
- Mat'l GP on each line, the same way.
- Freight works out from Mat'l Qty times Freight $/u on each line.
- Additional / Misc holds what the takeoff can't know: carpet assessment fee, subsistence, travel and zone pay, disposal, moisture tests and others, each with its own GP %.
- Tax, performance bond, contingency and burden start from your Settings and can be changed for this bid.
- The Estimate Quote Recap shows material, labor, profit % and the proposal price as you type.
Step 6Check the labor against real days2 min
WhereEstimate Quote›Project Man Days
A labor price that looks right per square foot can still be short on days. Project Man Days divides each line's quantity by what one installer does in a day for that kind of work, using your Man Day Rates. The total shows on the Estimate Quote, with change orders and alternates added separately.
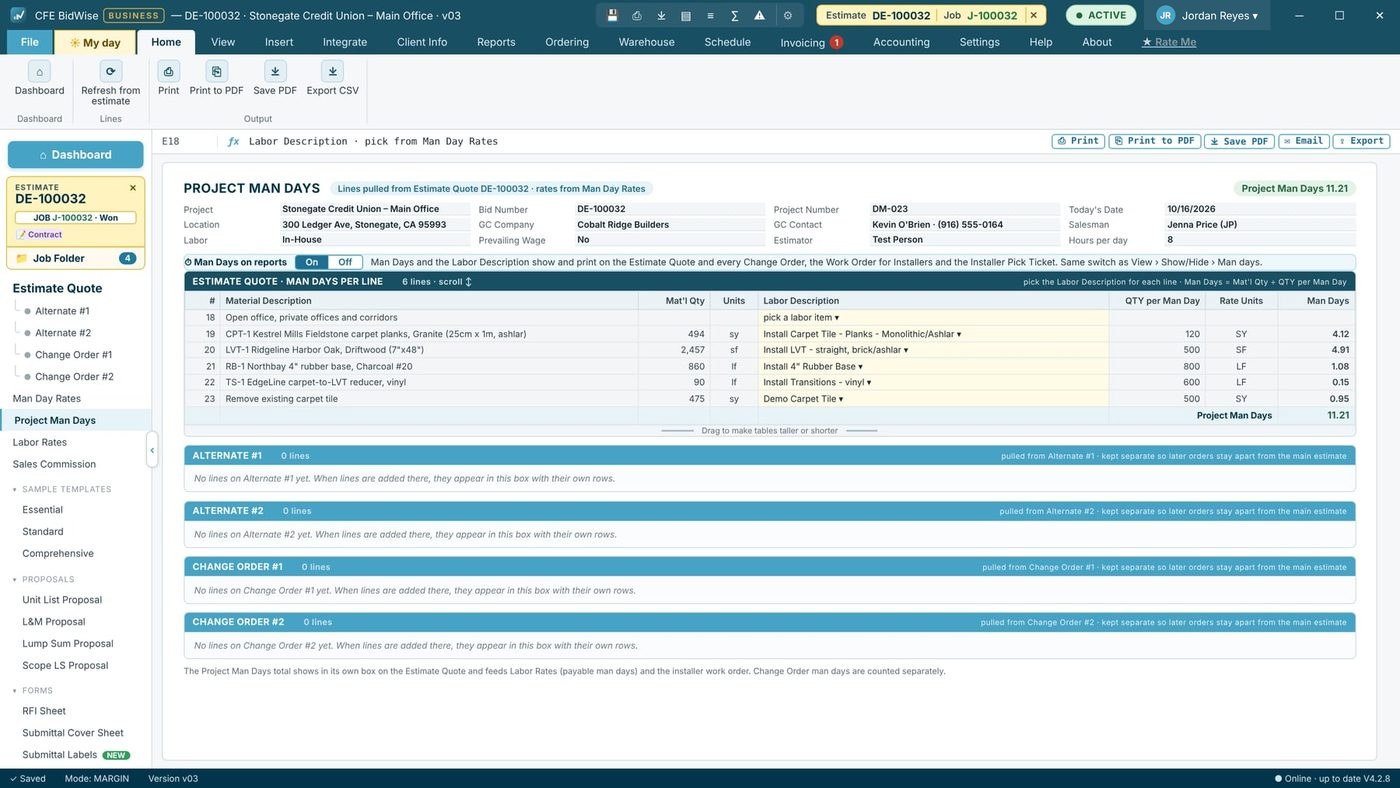
If the job needs 11 man days and your labor covers 8, you see it before the bid goes out, not after the crew has been on site for two weeks. Alternates and change orders work the same way, each on its own sheet with its own ID such as -ALT-1, and they print on the proposal under their own names.
Step 7Print the proposal2 min
WhereEstimate Quote›Proposals›Unit List Proposal
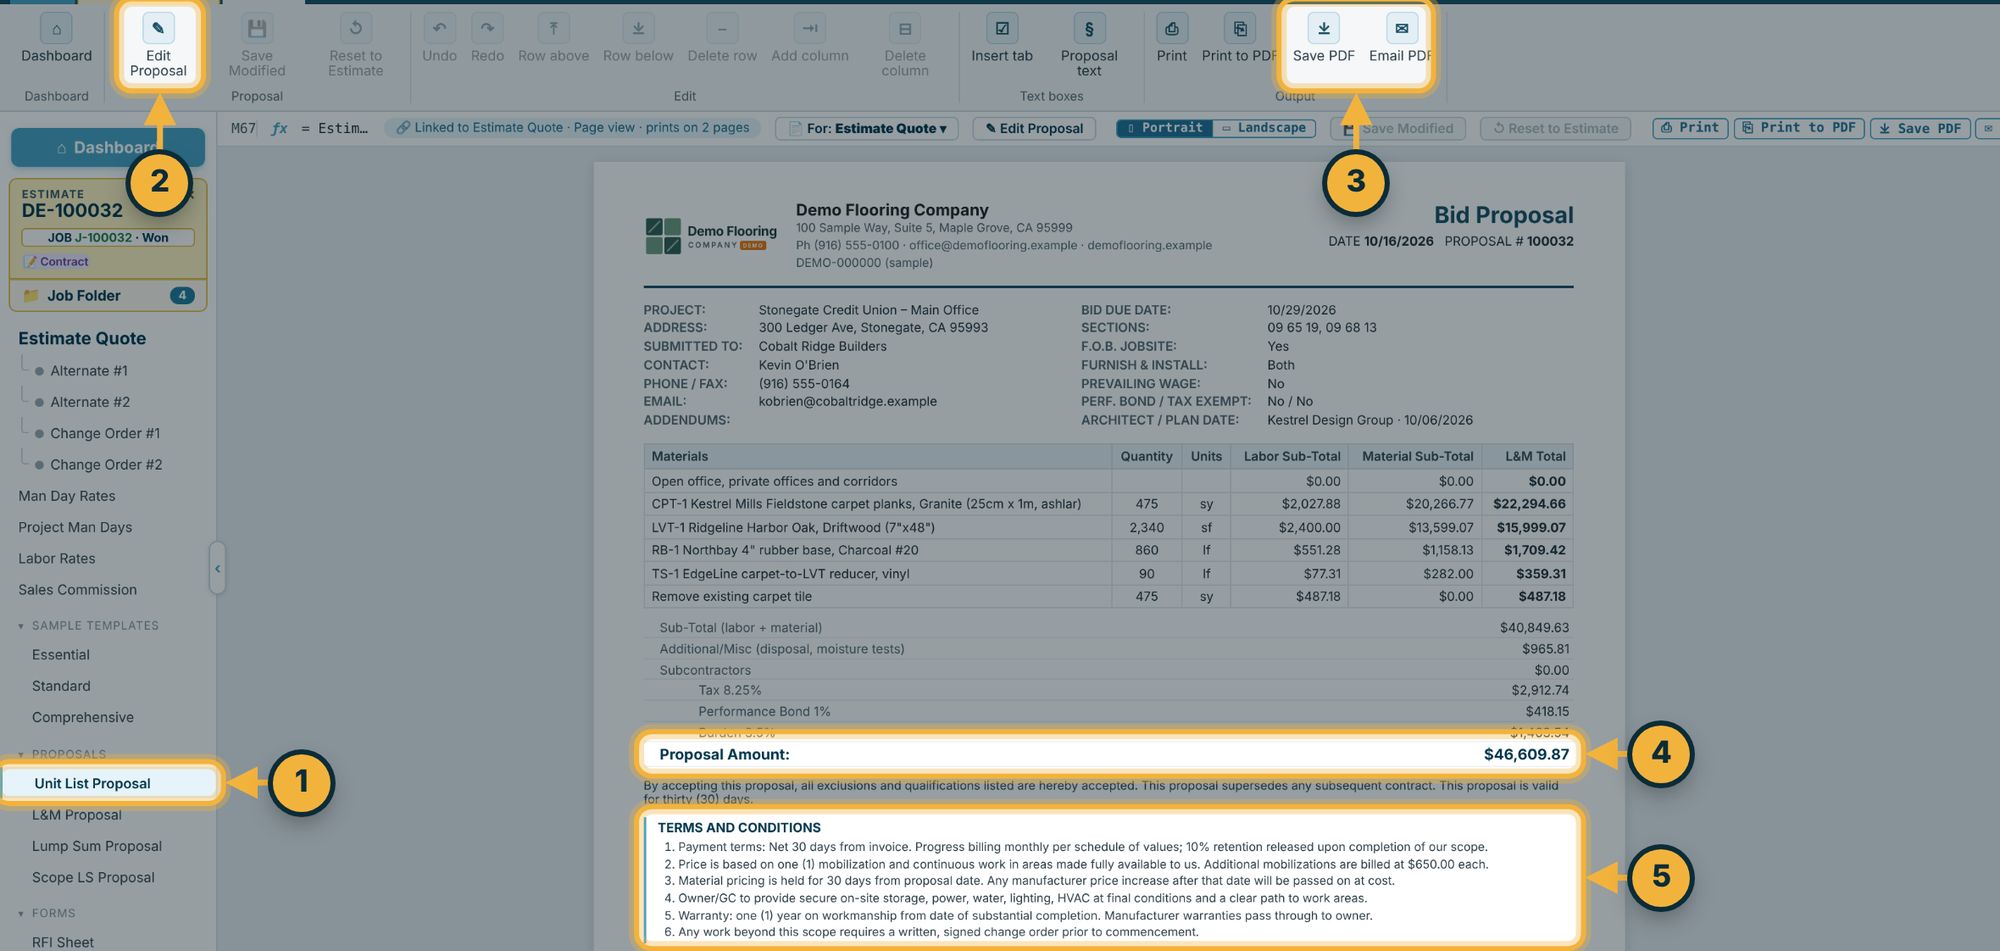
- In the menu on the left, under Proposals, pick Unit List, L&M, Lump Sum or Scope LS Proposal.
- Edit Proposal lets you type anywhere on the page. Reset to Estimate builds it again from the numbers.
- Save PDF or Email PDF sends it to the GC.
- The Proposal Amount comes straight from the estimate, so it always matches.
- Your terms, exclusions and qualifications come from Settings, in the order you set. See step 6 of the setup guide.
Step 8Track it until the GC decides1 min
WhereDashboard›Bid Tracker
Saving the bid puts it on the Bid Tracker with its GC, amount and due date. Set a follow-up and it shows on My day when it is time to call. When the GC awards it, mark it Won: the job gets its number, and the same estimate becomes the material list, the purchase orders and the first invoice.
Done when the bid is on the Bid Tracker with a follow-up date.