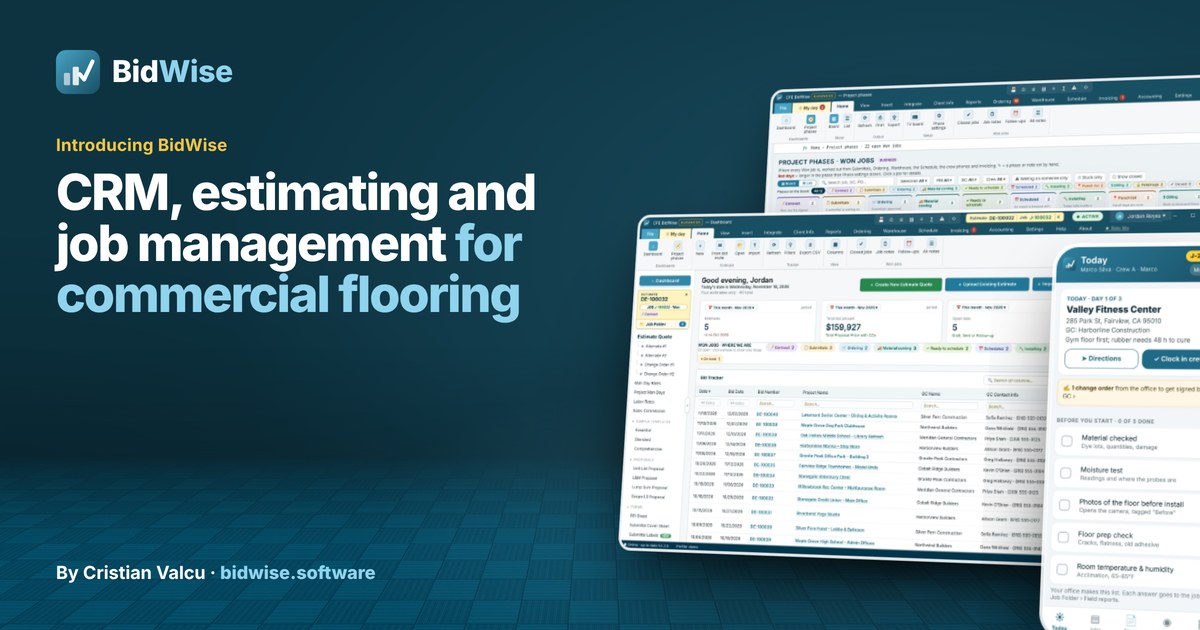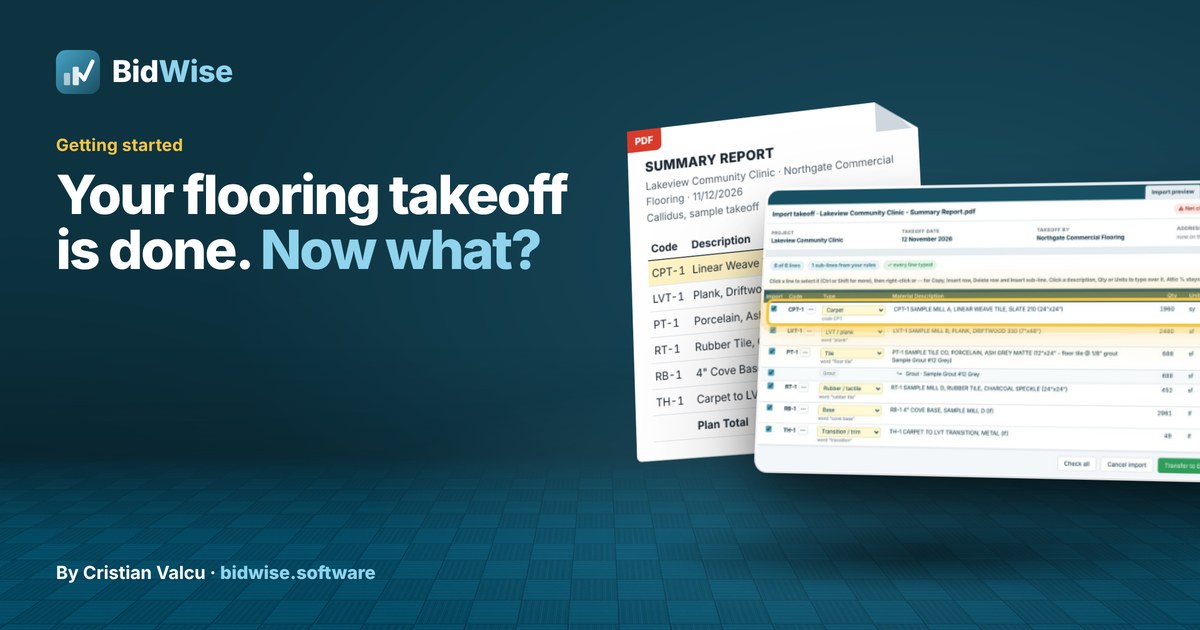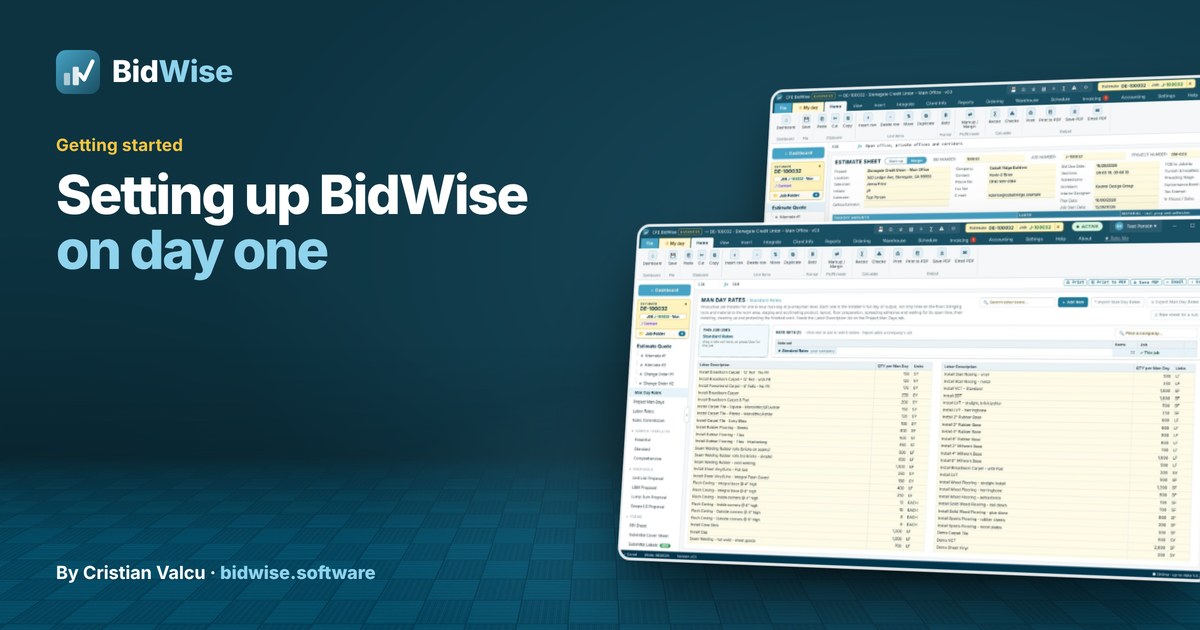
Most of what makes a bid yours is set once: your company details, the wording on your proposals, your margins, your production rates and your labor rates. Do it in the first hour and every estimate after that starts from your numbers instead of ours.
Every step below shows the real BidWise screen. The yellow numbers on each picture match the numbered clicks under it. Click any picture to open it full size.
Step 1Download and install5 min
Wherebidwise.software›Download
- Open bidwise.software/download on the Windows 10 or 11 PC you bid on, and download CFE-BidWise-Setup.exe.
- Open it from your Downloads folder. The installer is signed by Commercial Flooring Estimating LLC and always installs the newest version.
- Click Install. BidWise opens by itself when it is done.
If your IT person installs software for the office, the same page has an offline installer and an MSI package for silent installs.
Done when BidWise opens on its first window, Create the Admin account.
Step 2Create the Admin account3 min
WhereFirst start›Create the Admin account
The first account on a PC is the Admin. It manages the users and the company settings, so make it the owner's or the lead estimator's.
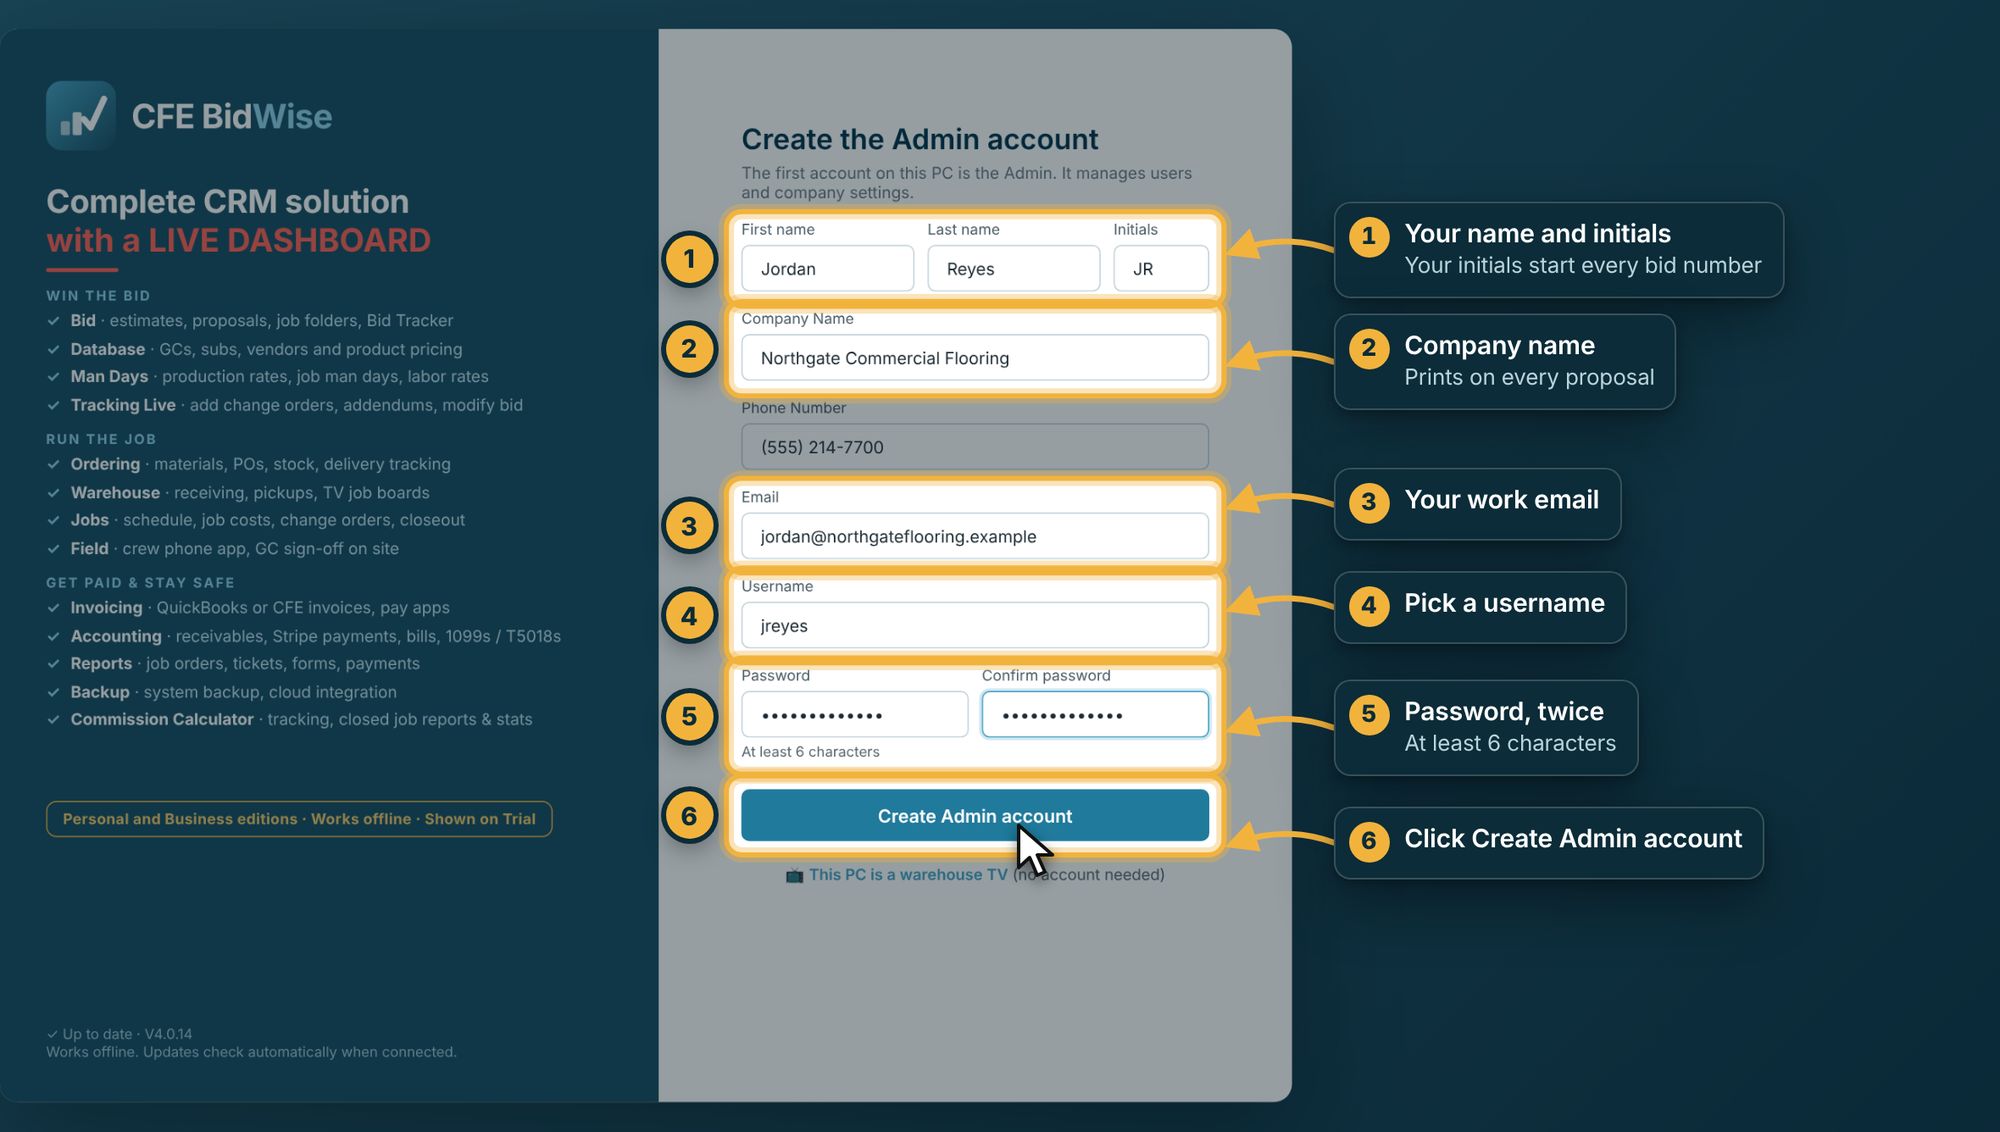
- Type your first name, last name and initials. Your initials start every bid number, so JR makes JR-260101.
- Type your company name the way it should print on proposals. Add the phone number under it.
- Type your work email. BidWise sends codes and notices here.
- Pick a username. You sign in with it every day.
- Type a password twice, at least 6 characters.
- Click Create Admin account.
If BidWise asks for a 6-digit code, it is in the email you just typed. The 30-day trial starts now, with every feature on and no credit card.
Done when you are signed in and the Dashboard opens.
Step 3Print your company recovery key2 min
WhereDashboard›Print your company recovery key
Your bids are locked with a company key that every team PC has. The printout is for the day every PC is lost or the person who set it up leaves. Don't skip it.
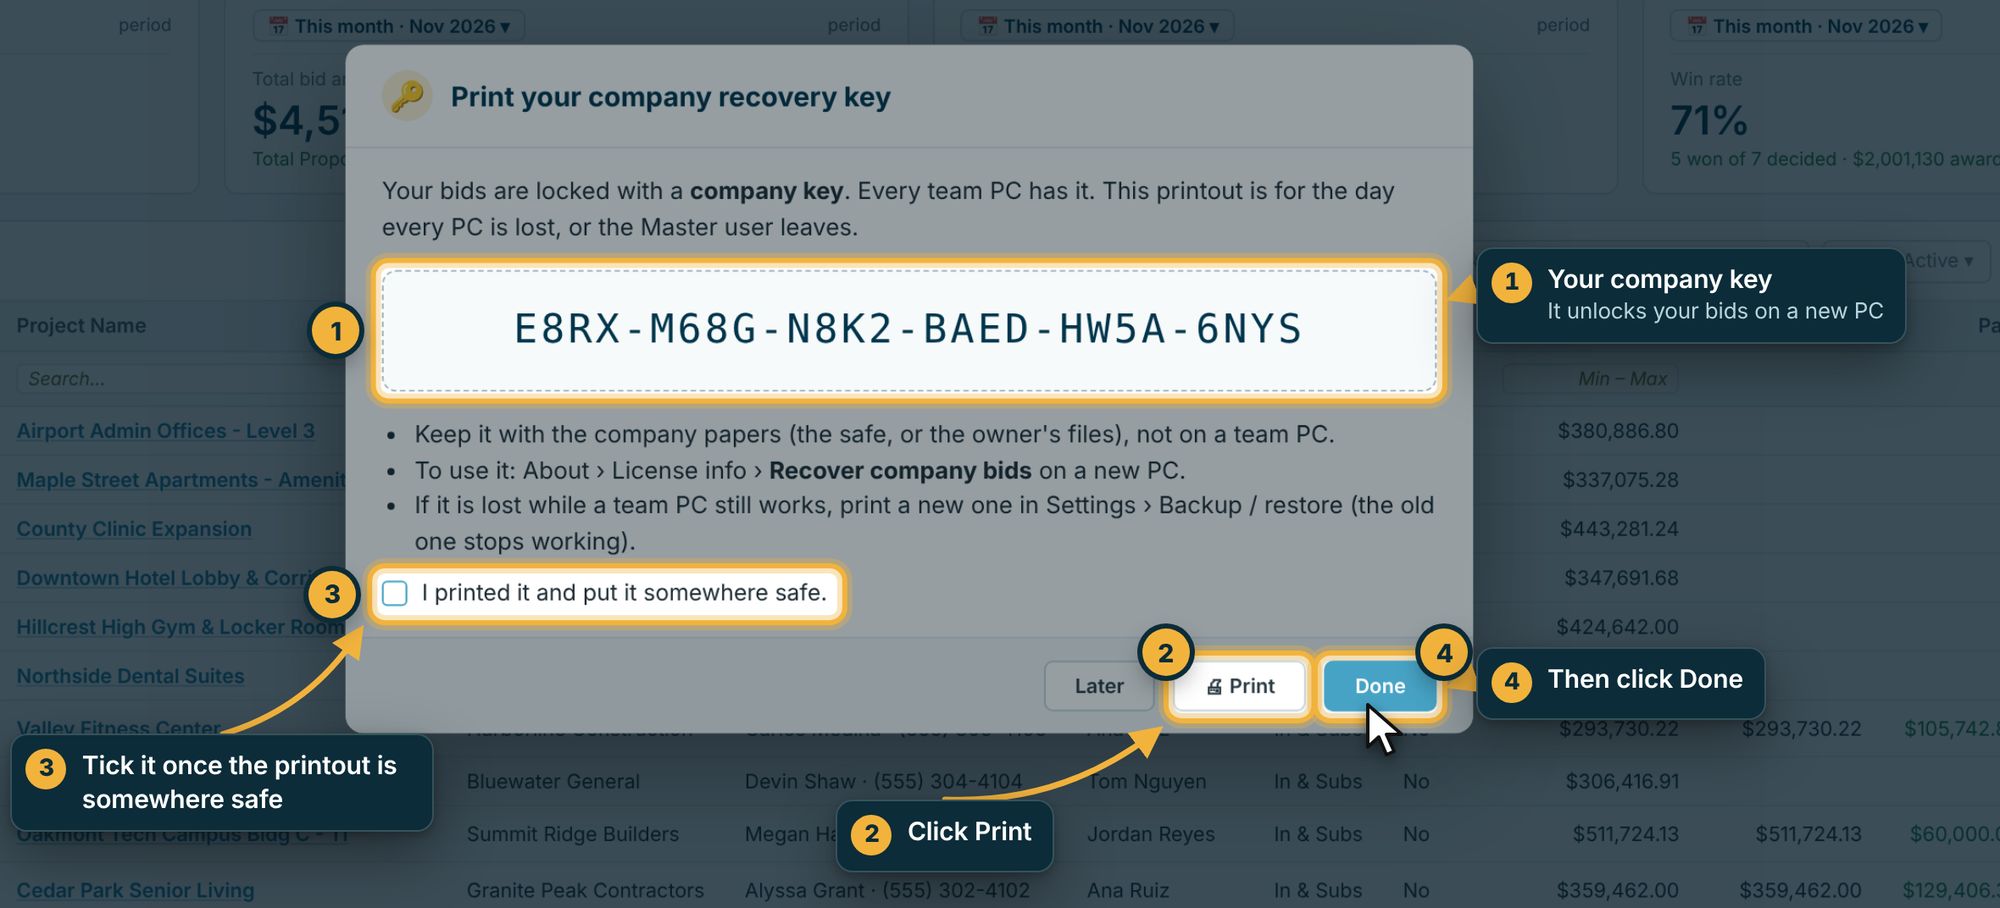
- This is your company key. On a new PC it goes into About › License info › Recover company bids.
- Click Print.
- Put the printout with the company papers (the safe or the owner's files, not on a team PC), then tick I printed it and put it somewhere safe.
- Click Done.
Done when the key is printed and filed. If you clicked Later, do it before your first real bid: Settings › Backup / restore prints a new key (the old one then stops working).
Step 4Find your way around the Dashboard2 min
WhereHome tab›Dashboard
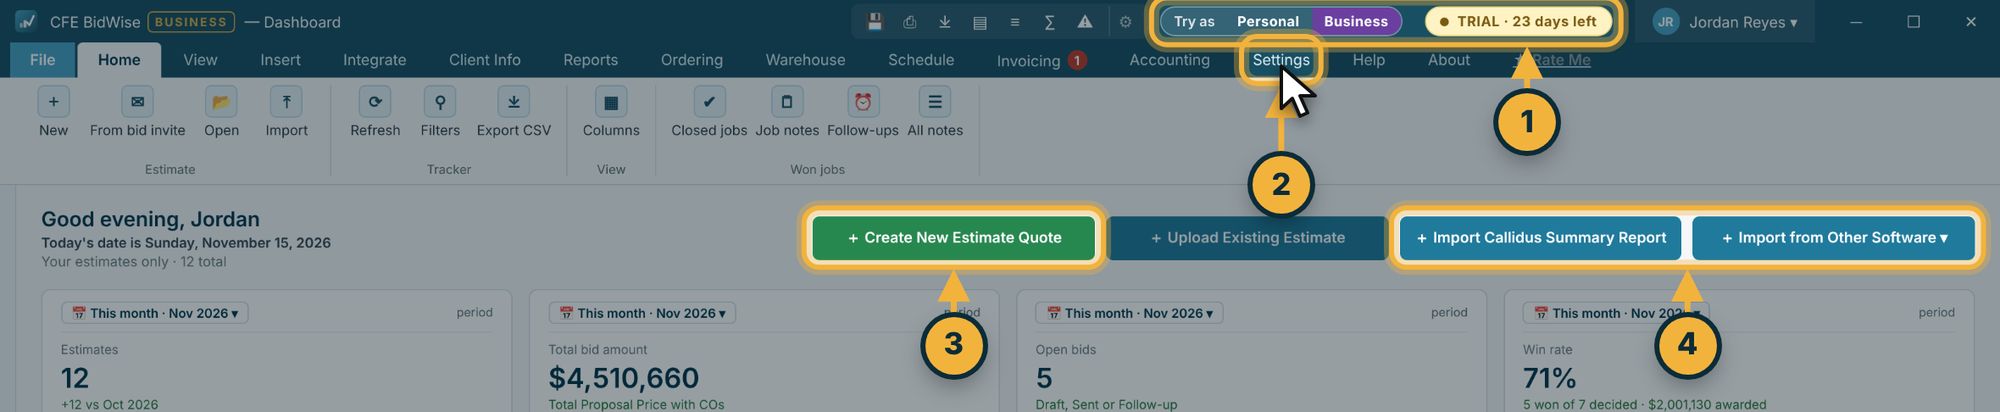
- Trial shows the days you have left. Try as flips the same bids between the Personal and Business view, so you can see what each plan includes before you pick one.
- Settings is where steps 5 to 7 happen. Click it now.
- Create New Estimate Quote starts a bid from a blank sheet.
- Import Callidus Summary Report and Import from Other Software start a bid from a finished takeoff. That is step 10.
Done when you can see the Settings tab and the four green and blue buttons.
Step 5Company info, logo and license10 min
WhereSettings›Company info
Everything on this screen prints in the header of every proposal and RFI, so take the time to get it right once.
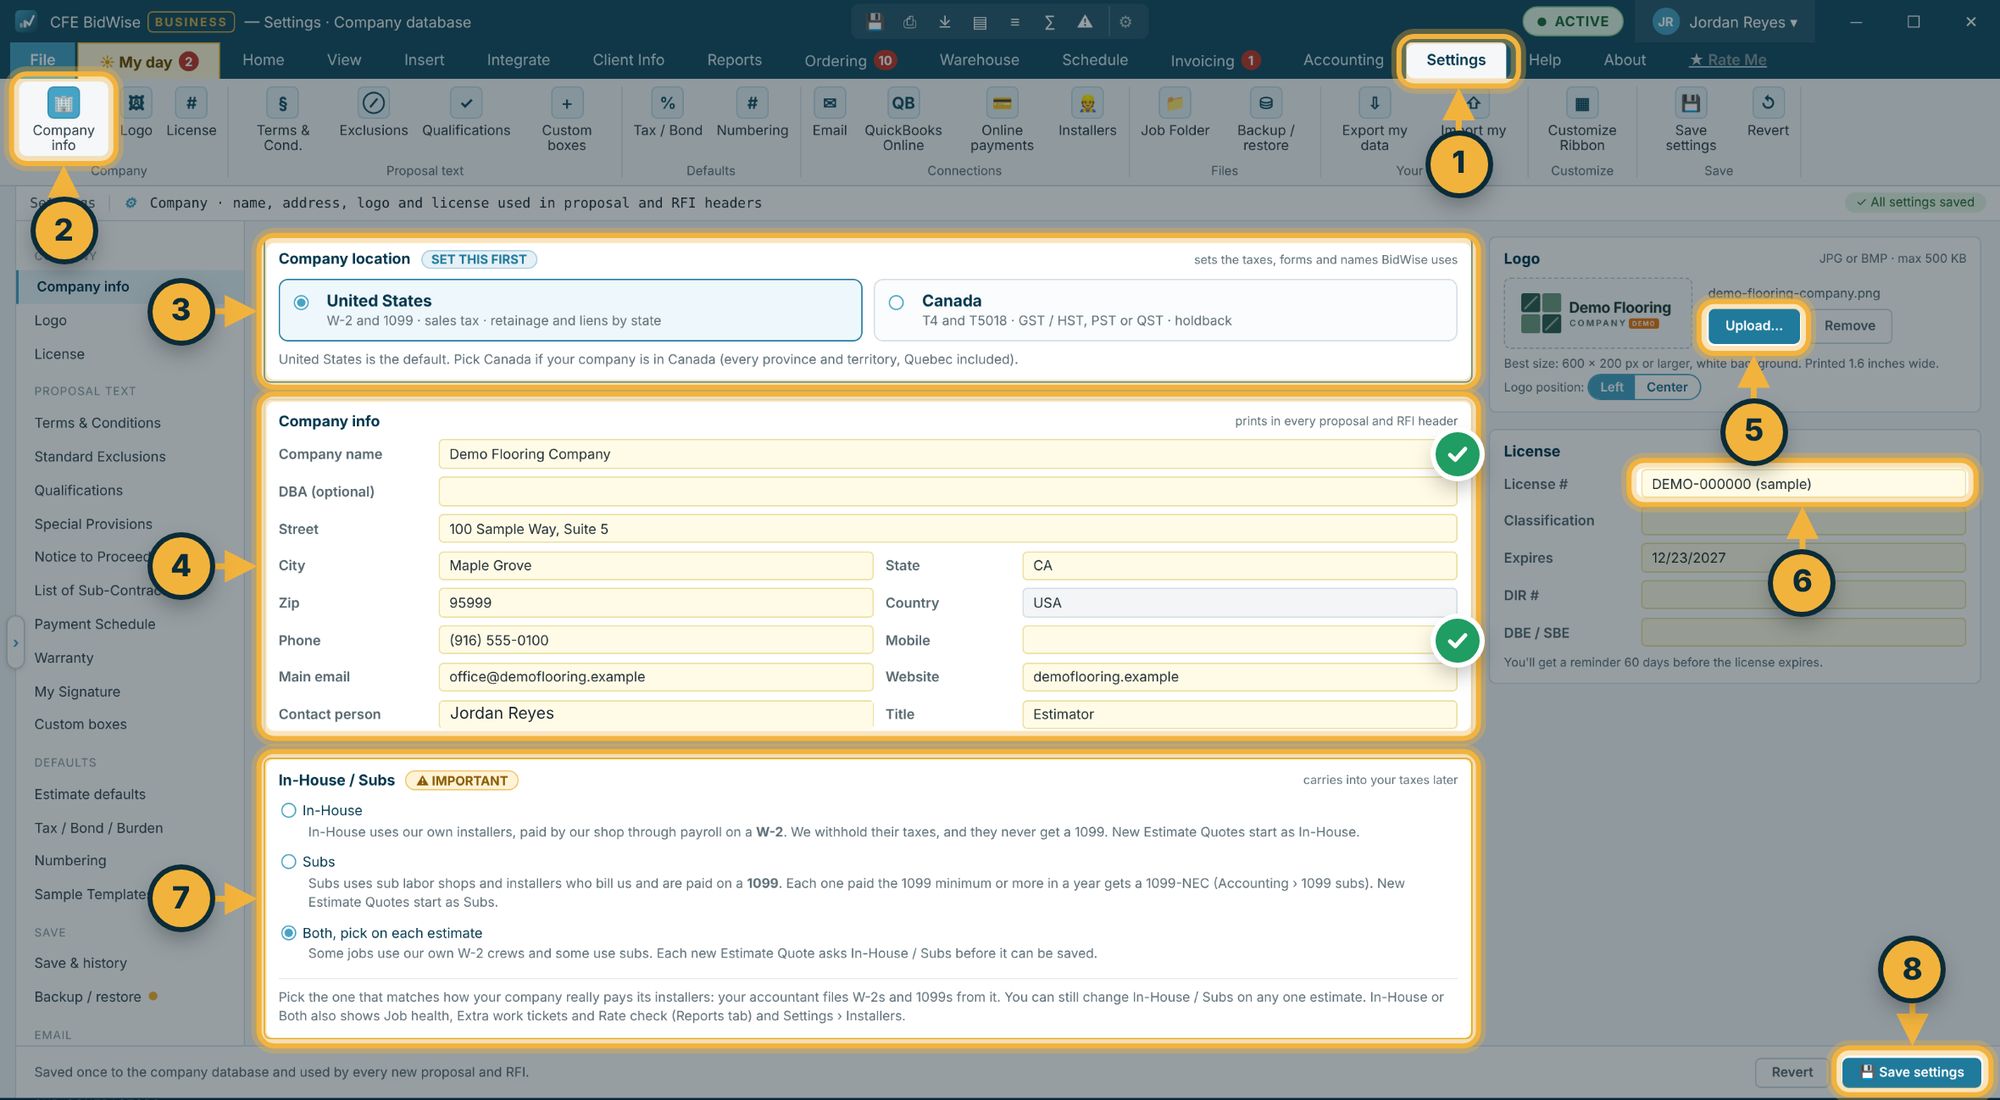
- Click the Settings tab.
- Click Company info, the first button on the left.
- Pick United States or Canada first. It sets the taxes, forms and lien rules BidWise uses (W-2 and 1099 and retainage, or T4, T5018, GST / HST / PST / QST and holdback).
- Fill in the company name, DBA if you have one, street, city, state, zip, phone, main email, website, contact person and title.
- Click Upload... and pick your logo, a JPG or BMP up to 500 KB. A logo at least 600 by 200 pixels on a white background prints best. Choose Left or Center under it.
- Type your license number, classification and expiry date, plus DIR and DBE / SBE numbers if you have them. BidWise reminds you 60 days before the license expires.
- Pick how you pay installers: In-House (your own W-2 crews), Subs (installers who bill you on a 1099) or Both, pick on each estimate. Your accountant files from this, and you can still change it on any one estimate.
- Click Save settings at the bottom right.
Done when the top right of Settings says All settings saved.
Step 6Proposal wording10 min
WhereSettings›Terms & Cond.
Terms, exclusions and qualifications are written once here and added to the bottom of every proposal. Nobody pastes them from an old Word file again.
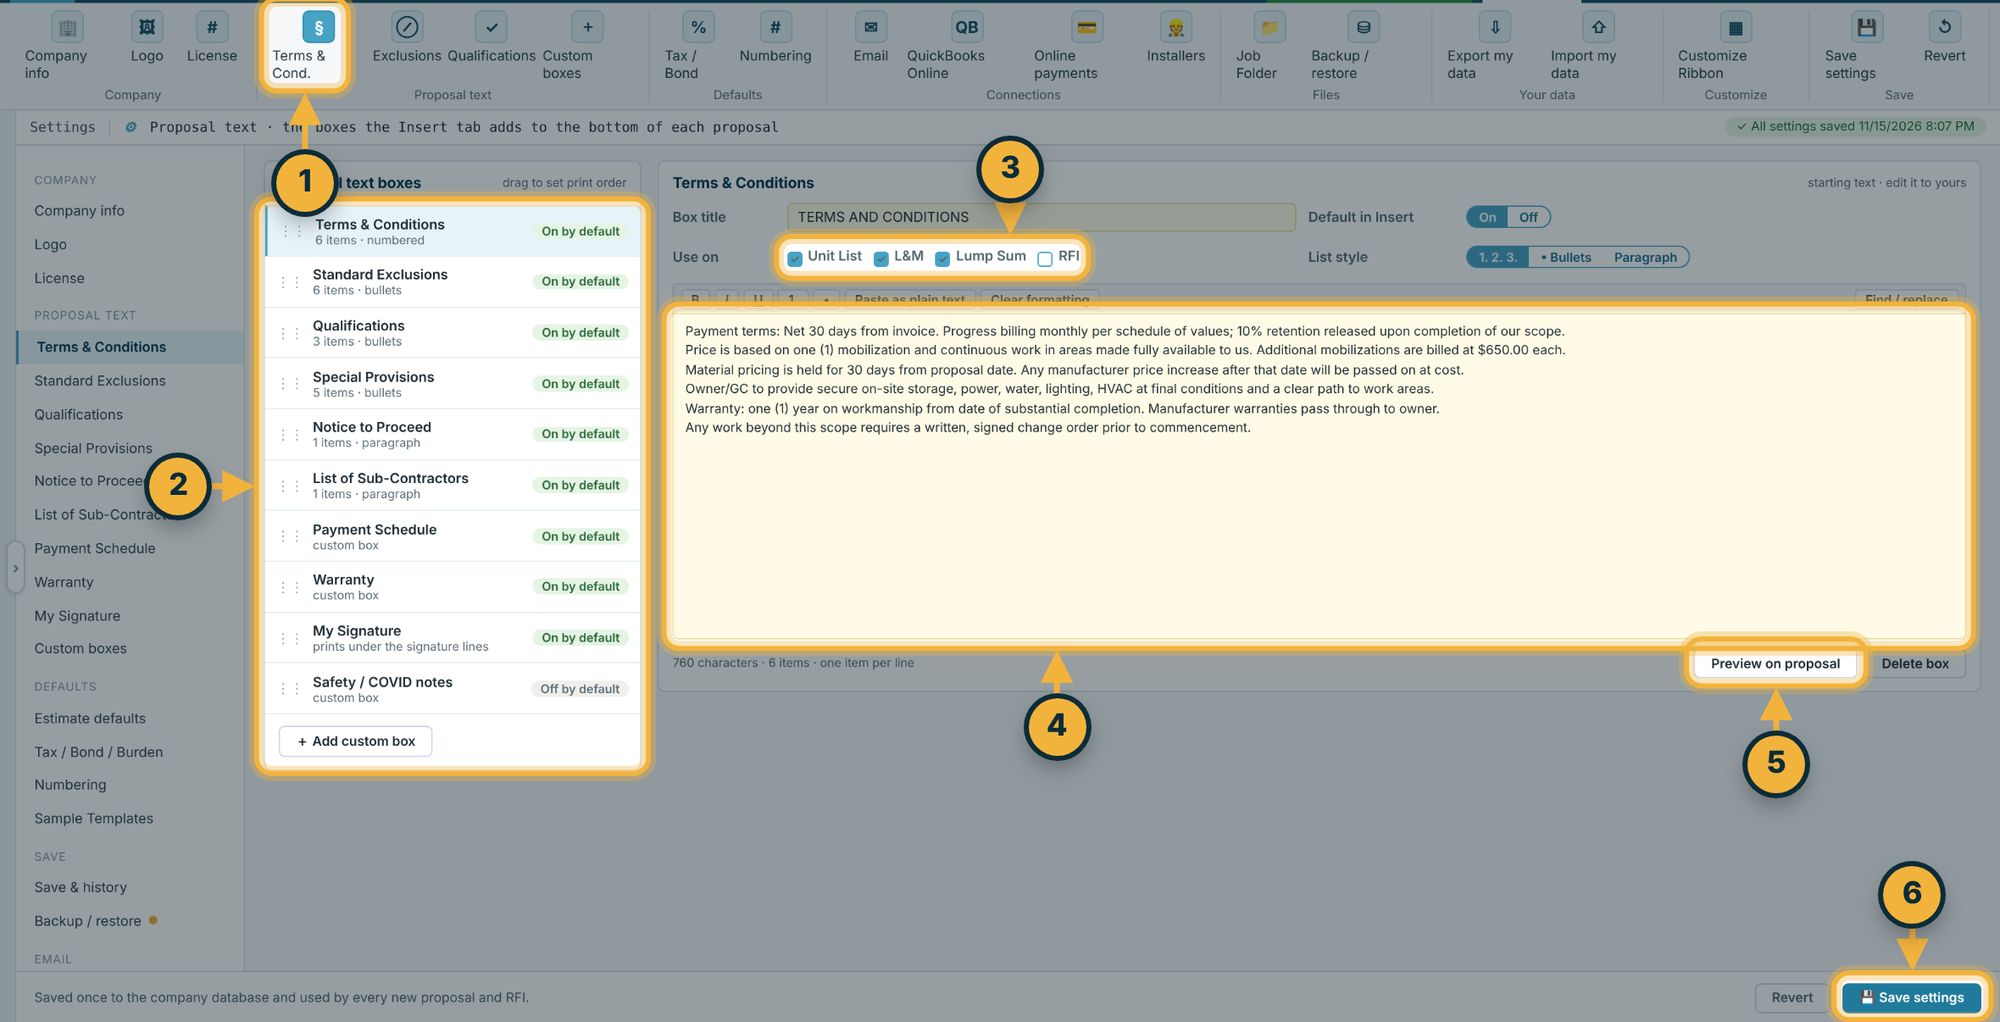
- In Settings, click Terms & Cond.
- The list on the left is every text box your proposals can carry: Terms & Conditions, Standard Exclusions, Qualifications, Special Provisions, Notice to Proceed, List of Sub-Contractors, Payment Schedule, Warranty and My Signature. Drag them into the order they should print. Each one says whether it is On by default.
- Under Use on, tick the proposals this box prints on: Unit List, L&M, Lump Sum or RFI.
- Type your wording in the big box, one item per line. Pick numbered (1. 2. 3.), bullets or a paragraph next to List style.
- Click Preview on proposal to see it on the page.
- Click Save settings.
Then click the next box on the left and do the same: Standard Exclusions, Qualifications and the rest. In My Signature add your name and title, and proposals close with them under the client's signature lines. + Add custom box makes a box of your own, such as safety notes. On each proposal you can still tick a box off or change the order for that one bid.
Done when Preview on proposal shows your own terms, exclusions and qualifications.
Step 7Margins, tax, bond and burden5 min
WhereSettings›Tax / Bond
These are the numbers every new estimate starts with. You can change any of them on a single estimate later.
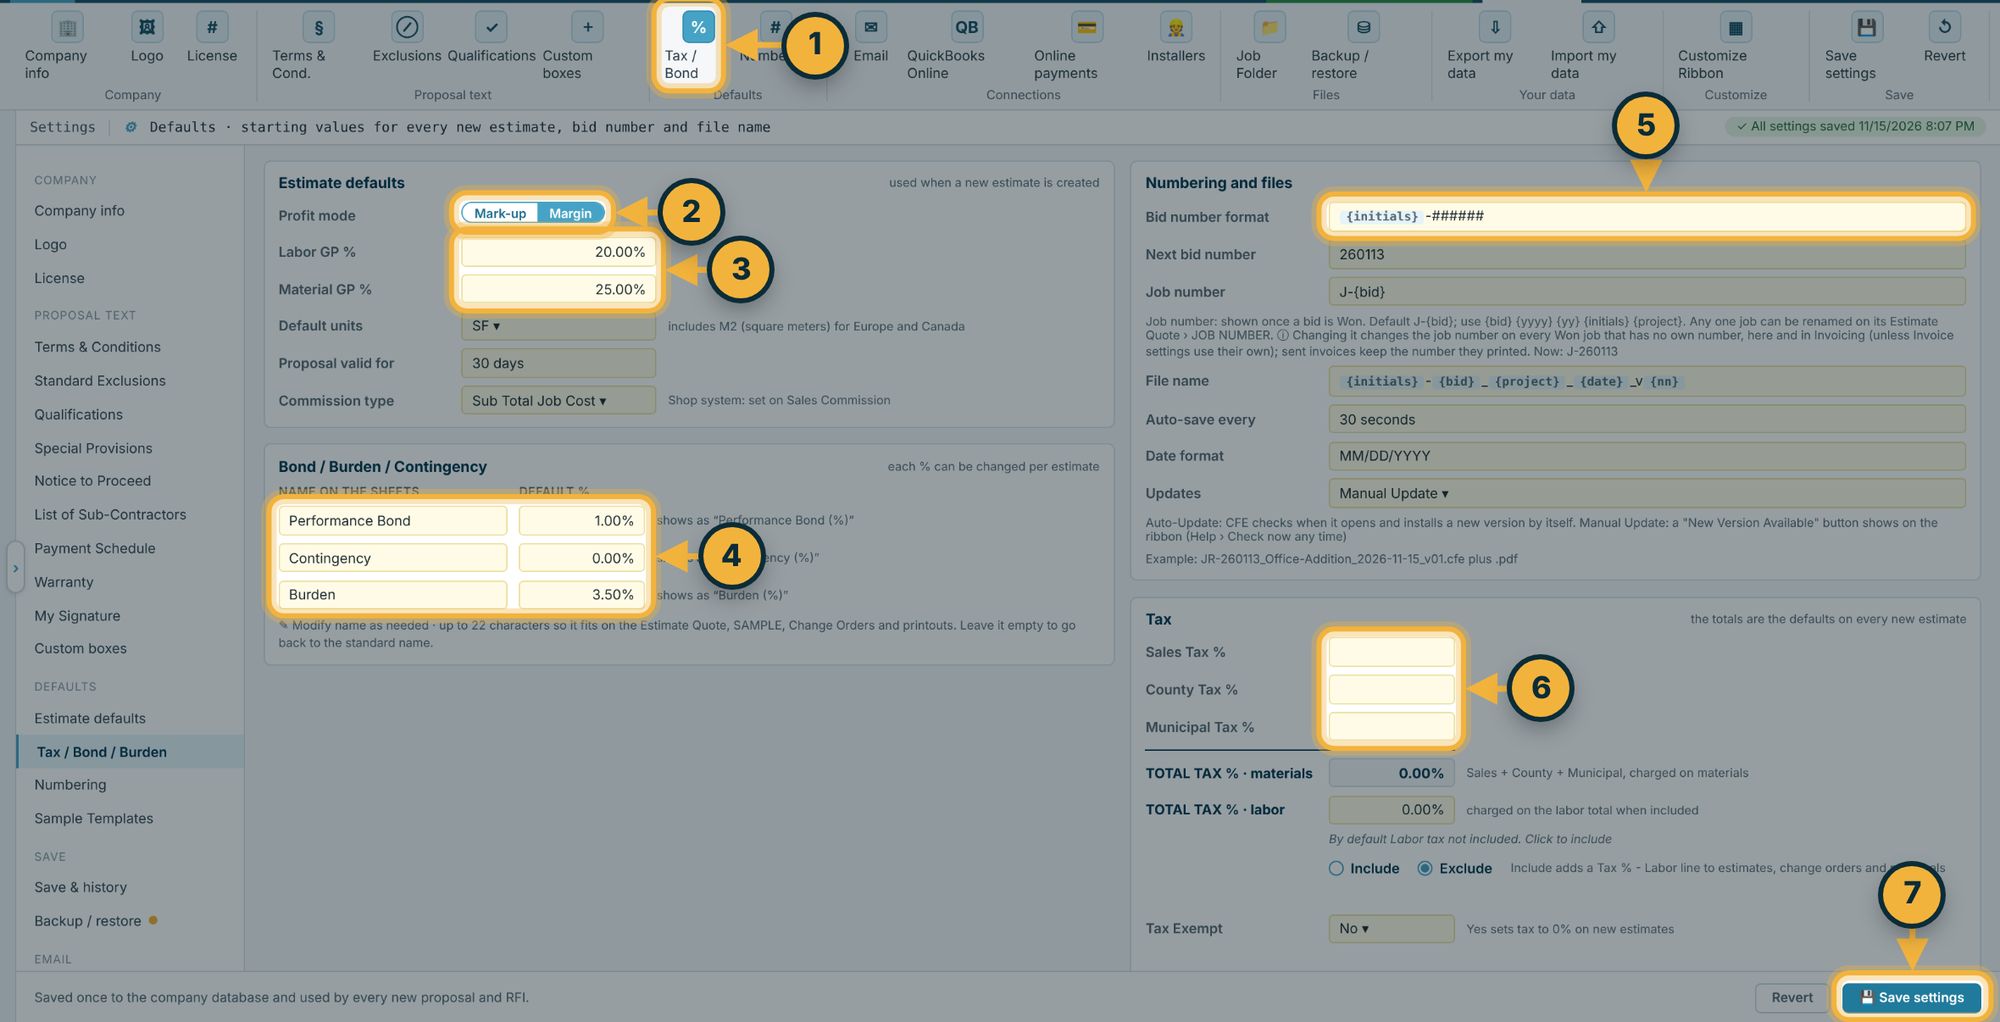
- In Settings, click Tax / Bond.
- Pick Margin or Mark-up, the way your company figures profit.
- Type your usual Labor GP % and Material GP %. Every new line starts with them, and you sharpen them line by line on the bid.
- Type your Performance Bond, Contingency and Burden percentages. You can rename them, up to 22 characters, and they print under those names.
- Check the Bid number format. It is your initials and six digits by default. Set Next bid number to carry on from the numbers you use today.
- Type your sales, county and municipal tax percentages. Labor tax stays off unless you click Include.
- Click Save settings.
Done when a new estimate opens with your GP, bond, burden and tax already filled in.
Step 8Production rates (Man Day Rates)10 min
WhereSAMPLE estimate›Man Day Rates
Man Day Rates are what one installer does in a full 8-hour day for each kind of work, counting the time to bring in material, lay out, prep, spread adhesive and clean up. Project Man Days uses them on every job to show how many days your labor price really pays for. BidWise starts you with 55 standard rates.
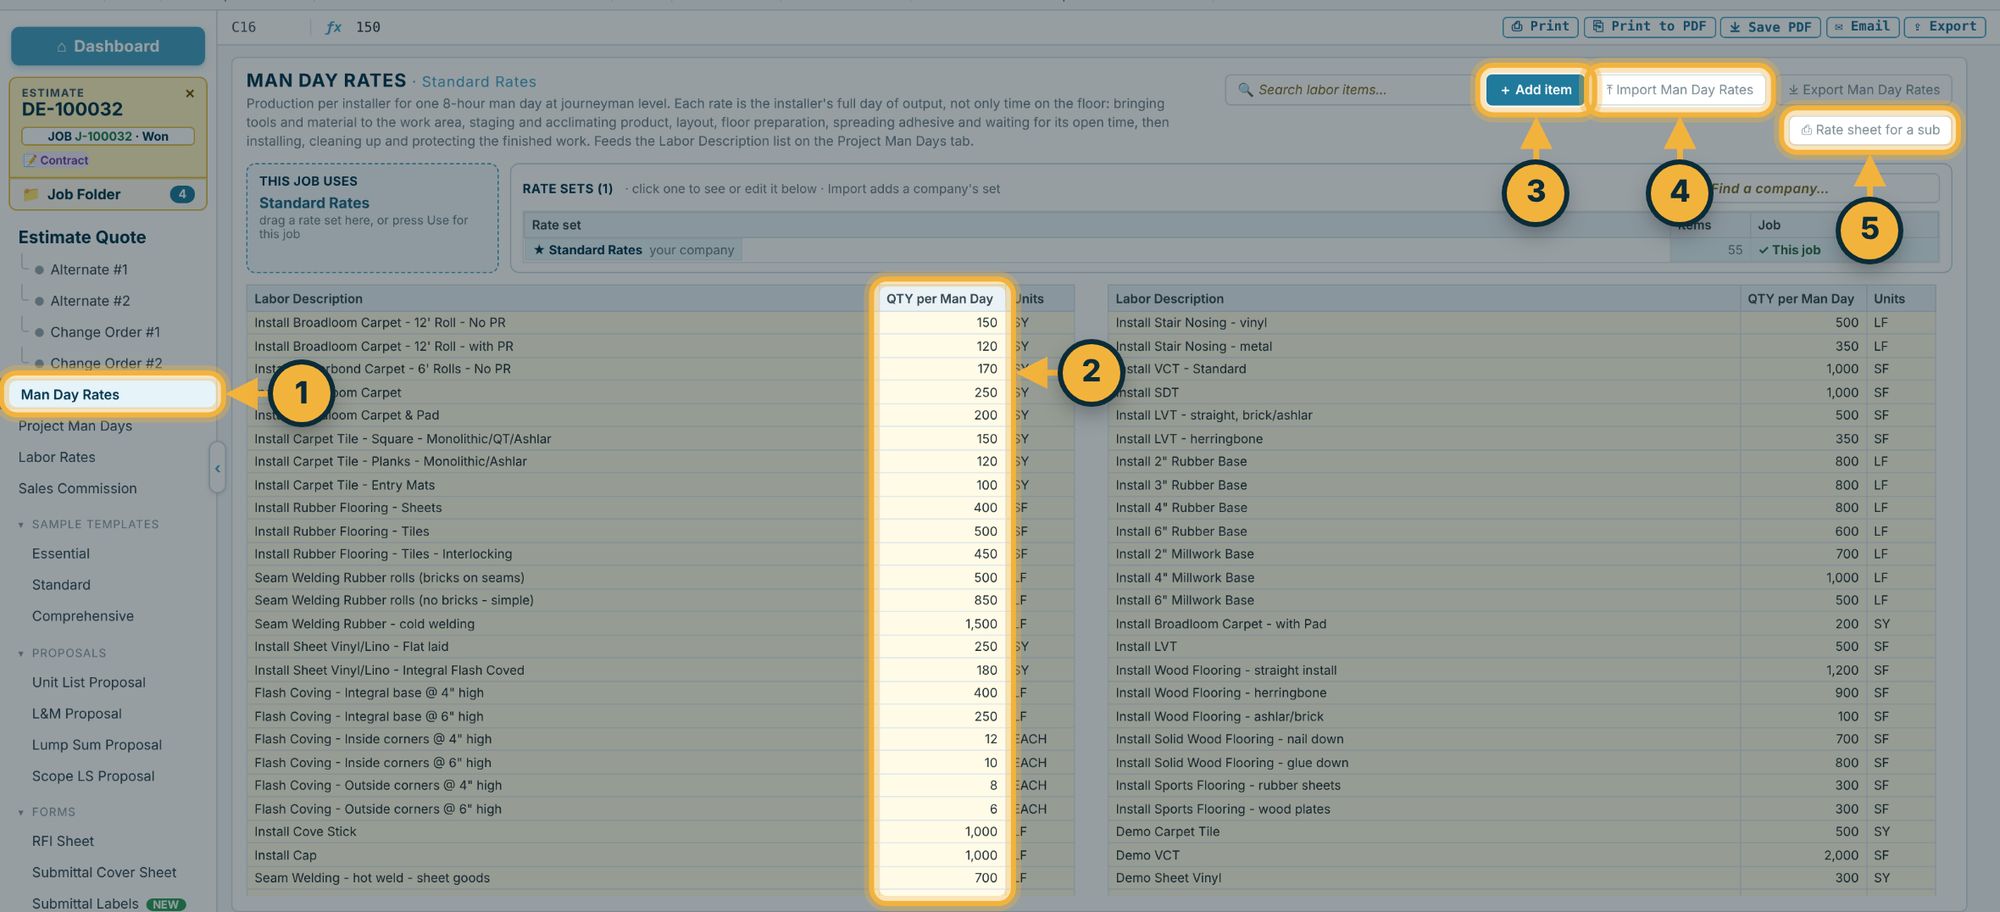
- Open the SAMPLE estimate (or any estimate) and click Man Day Rates in the menu on the left.
- Go down the QTY per Man Day column and change each number to what your own installers do in a day. Standard Rates is your company's set, and every job uses it unless you pick another.
- Click + Add item for work you do that is not on the list.
- Click Import Man Day Rates to bring in a whole rate set from a CSV, such as a sub's numbers.
- Click Rate sheet for a sub to print the list for a sub-contractor to fill in. Type their numbers back in as their own rate set.
Done when the rates on the list match the days your crews actually take.
Step 9Labor rates5 min
WhereSAMPLE estimate›Labor Rates
Labor Rates turn a labor price into crew days. Fill in only the yellow cells.
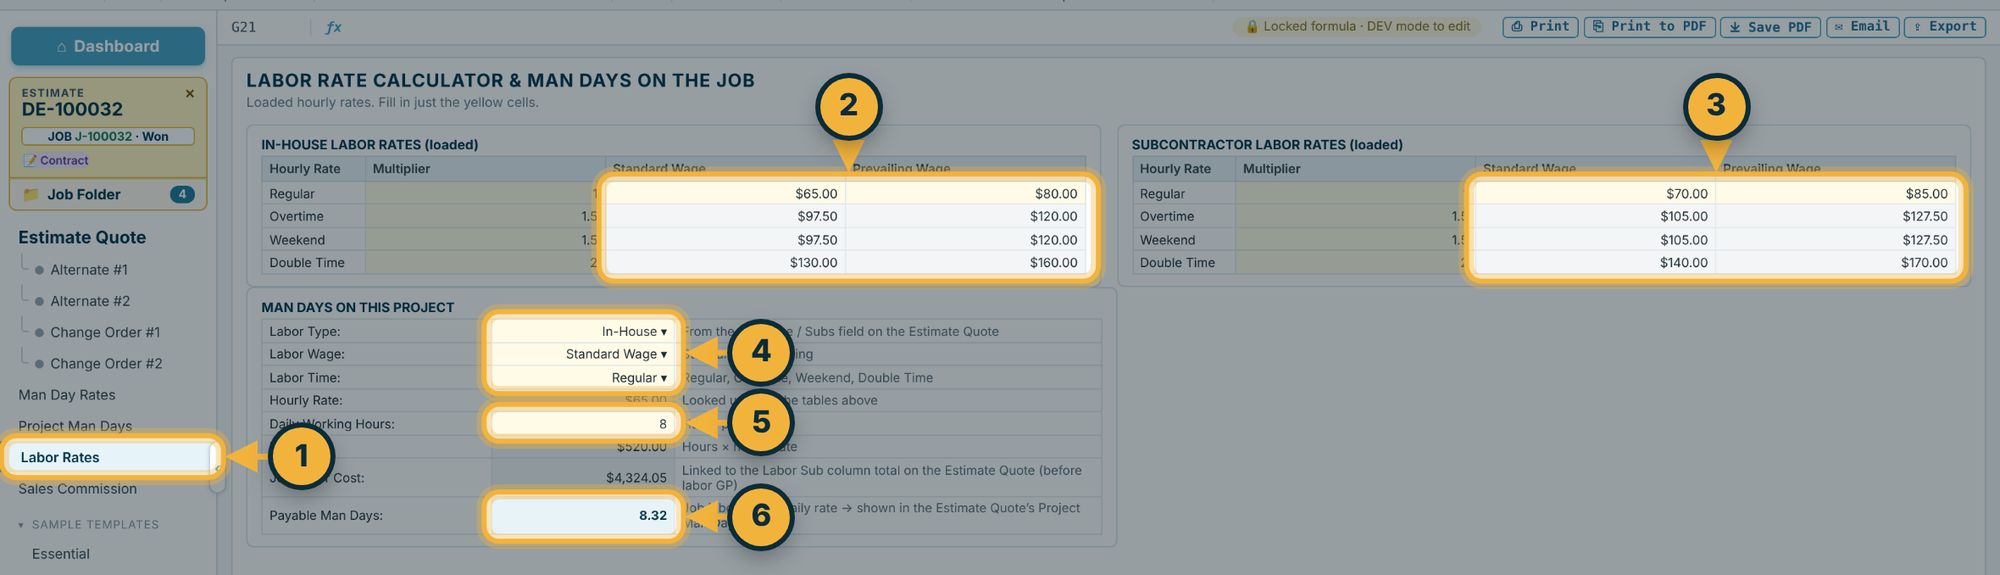
- Click Labor Rates in the menu on the left.
- Type your in-house loaded hourly rate for Regular, under Standard Wage and Prevailing Wage. Overtime, weekend and double time follow from the multipliers (1.5, 1.5 and 2), which you can change.
- Do the same for sub-contractor rates.
- For each job, pick In-House or Sub, Standard or Prevailing wage, and Regular time or overtime.
- Set the daily working hours, usually 8.
- Payable Man Days shows the days this job's labor cost pays for. It also shows in the Project Man Days box on the Estimate Quote.
Next to it, Sales Commission shows five commission systems side by side. Pick the one your company uses and it feeds the estimate.
Done when Payable Man Days on the SAMPLE estimate looks right for a job that size.
Step 10Price your first real bid15 min
WhereDashboard›Import Callidus Summary Report or Import from Other Software
Take a takeoff you already finished and priced the old way. Importing it is the fastest way to see BidWise work on your numbers.
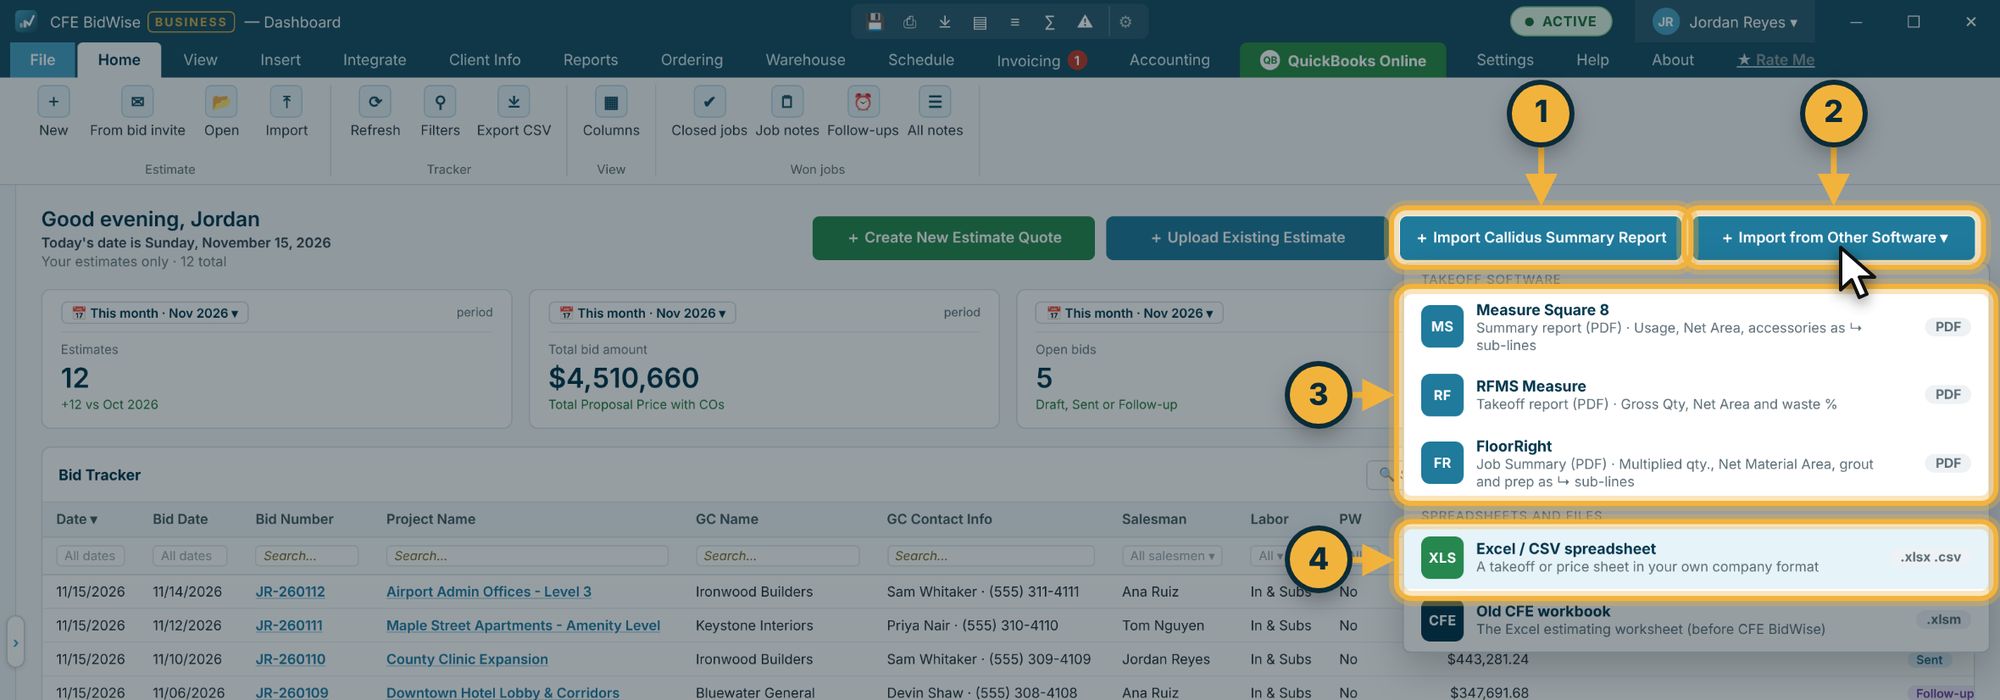
- From Callidus: click Import Callidus Summary Report.
- From anything else: click Import from Other Software.
- Pick Measure Square 8, RFMS Measure or FloorRight, then open that program's report PDF.
- Or pick Excel / CSV spreadsheet for a takeoff or price sheet in your own format.
BidWise reads every line, checks it and shows a preview before anything goes into the estimate. The whole import, click by click, is in Your flooring takeoff is done. Now what? Then set your labor and material prices, fill in freight and the extras, and print the proposal.
Done when you have a priced proposal for a job you already know. Compare it with the price you sent before.
Step 11Bring the team in5 min
WhereIntegrate›Team
On BidWise Business the Master user adds the team and decides what each person can open. Bids made on a team PC belong to the company and open only on your own team's PCs.
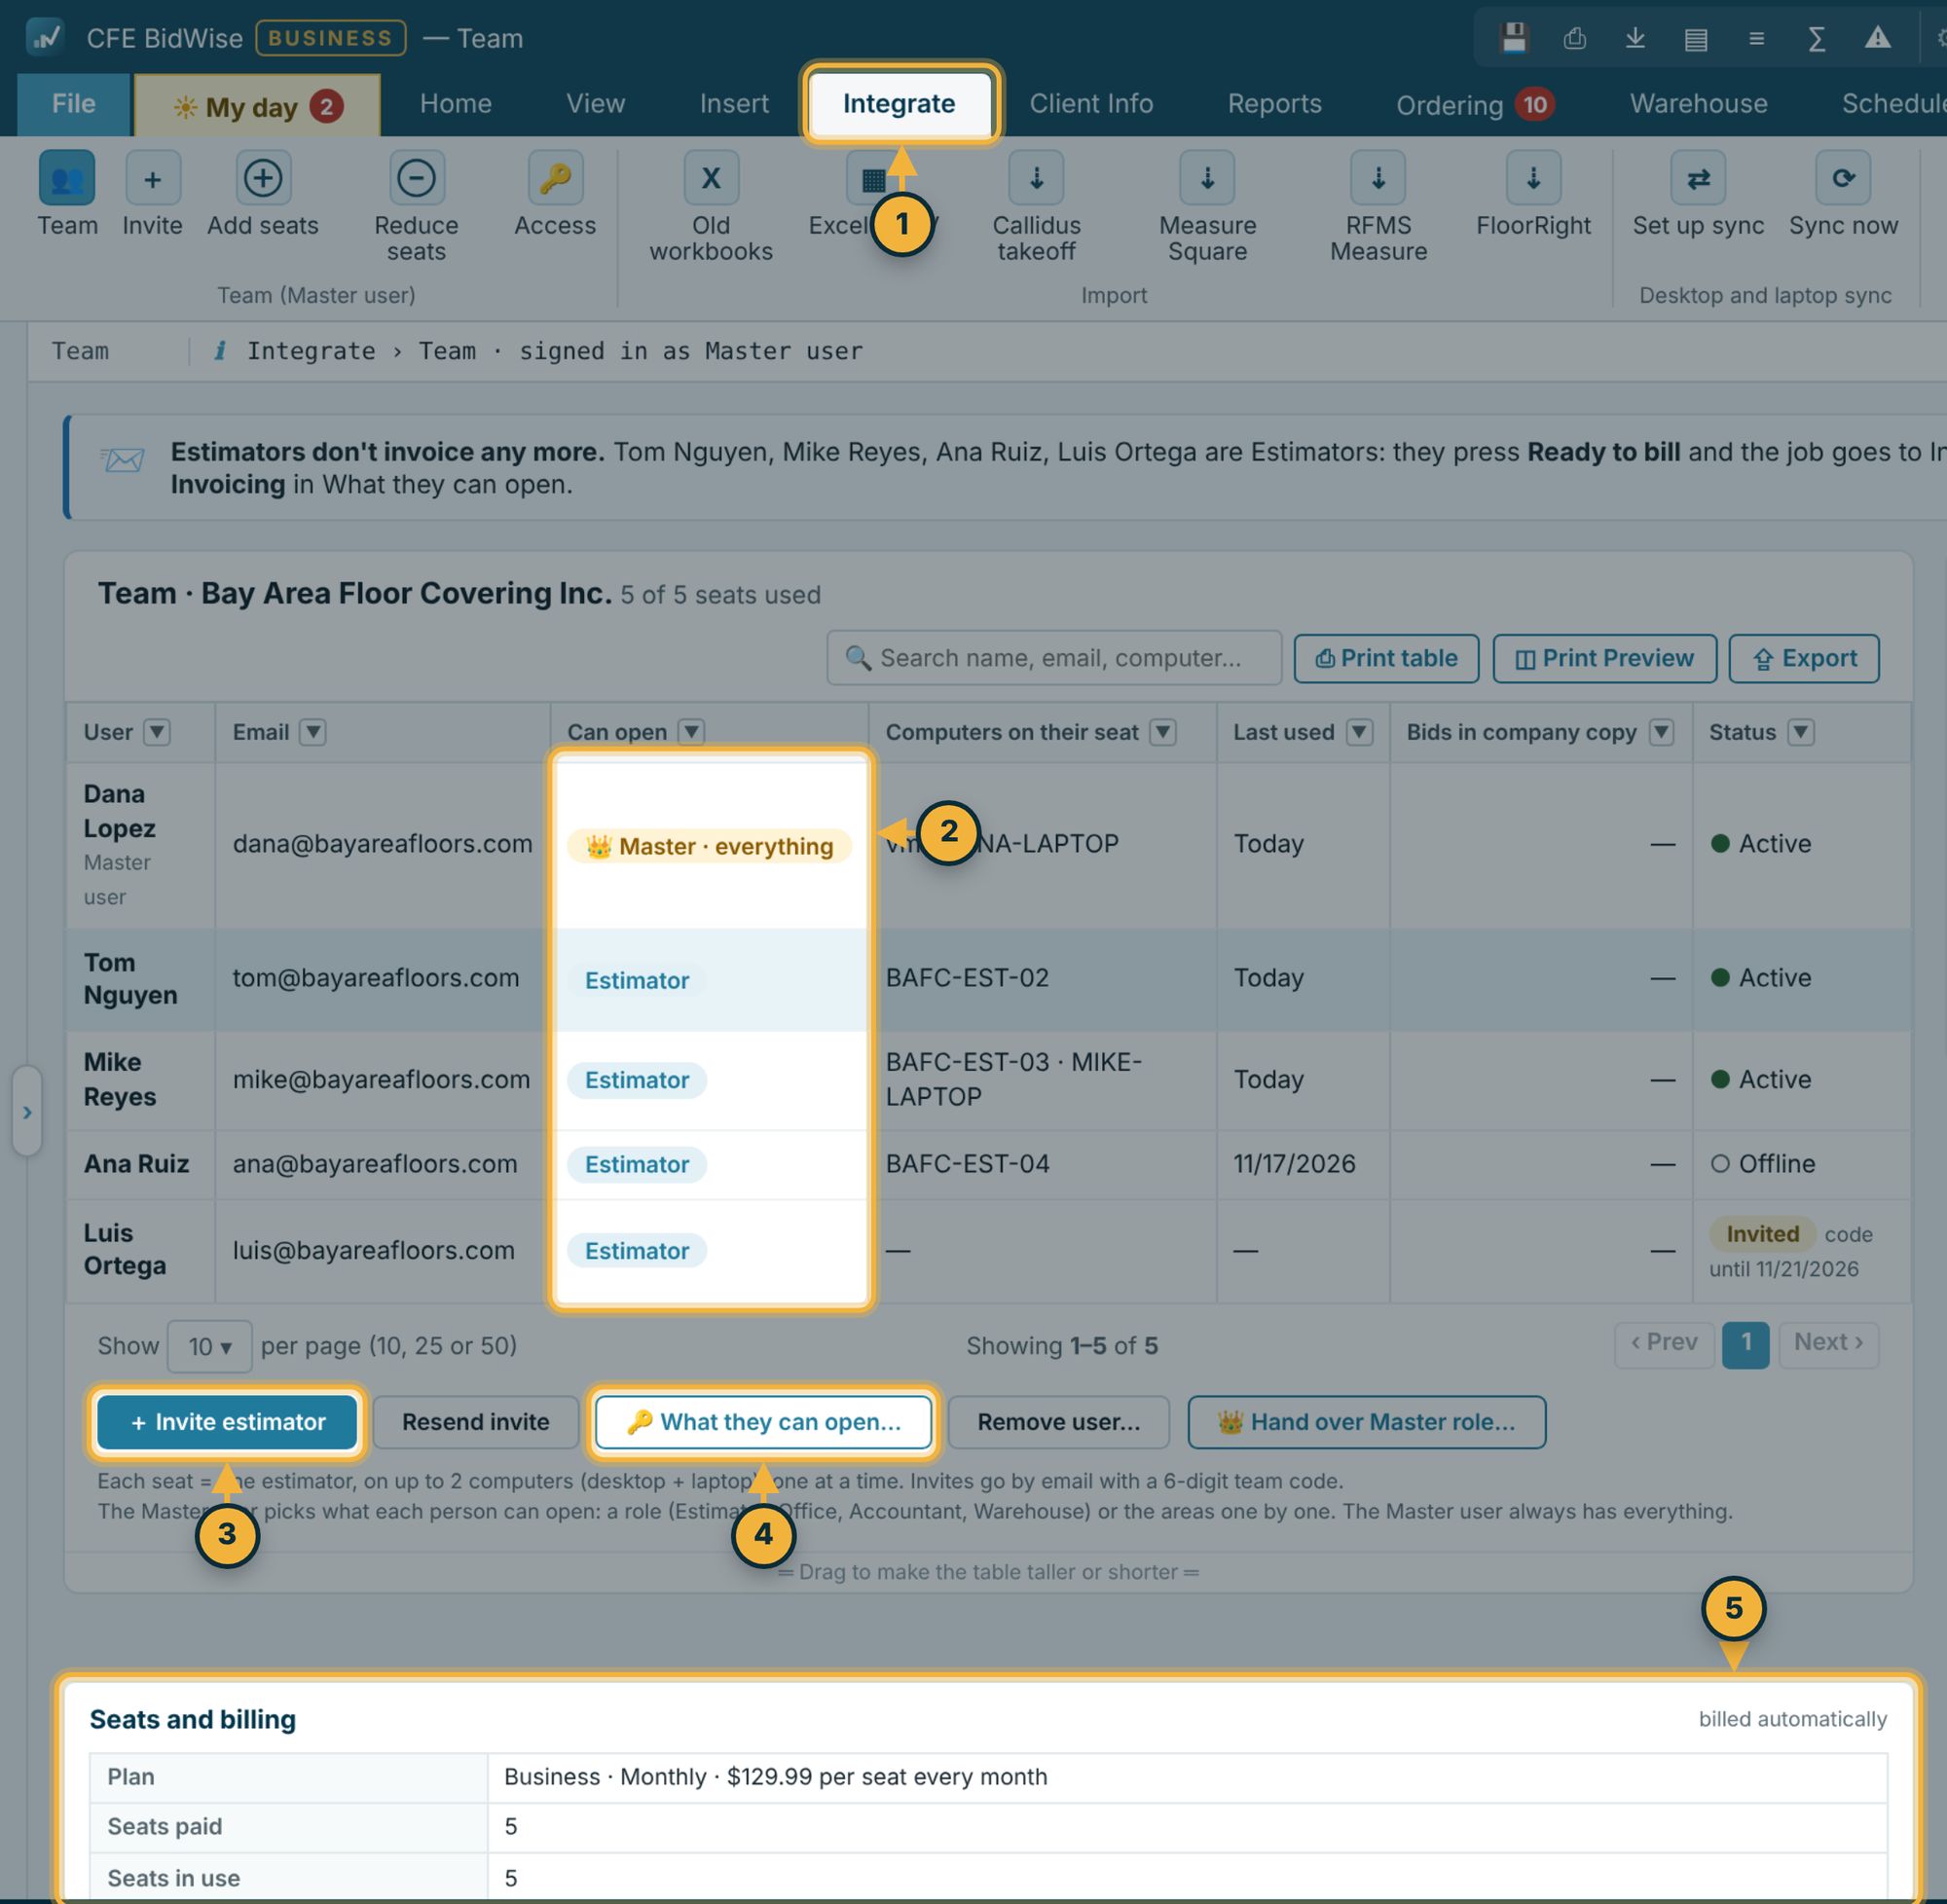
- Click the Integrate tab, then Team. Only the Master user sees it.
- Can open shows what each person can open. The Master user always has everything.
- Click + Invite estimator and type their email. They get a 6-digit team code by email to join from their own PC.
- Select someone and click What they can open... to give them a role (Estimator, Office, Accountant or Warehouse) or pick areas one by one.
- Seats and billing shows your plan: Business is $129.99 per seat a month. Each seat is one person on up to 2 computers, such as a desktop and a laptop. When every seat is taken, click Add seats first.
Done when each person signs in on their own PC and sees only what you gave them.
After the first hour
Connect QuickBooks Online when the first job is won (Settings › QuickBooks Online), add crew phones when you are ready to schedule, and turn on online payments so GCs can pay invoices by ACH or card. The User Guide inside BidWise (Help › User Guide) covers each of these step by step, with short videos.